Use this guide for setting up your new Blink Mini Camera.
Getting started
New to Blink? If so, welcome! To set up your new camera, you must first download the Blink app and set up a Blink Account.
Install the Blink app and create an account
This article will help you get started with the Blink app and setting up your new Blink account.
The latest version of the Blink app is always available in your app store. Blink supports most smartphones, tablets, and many Alexa-enabled products.
Tap your preferred app store option below to download the latest version of the Blink app.


How to Update your iOS and Android devices
In order to run the latest version of the Blink app, it's important your mobile device meets the minimum system requirements.
How to auto update your mobile devices
The easiest way to keep the app version of your mobile device current is to turn on the Automatic Update option in your device settings:
- Learn more about how to turn on or turn off automatic updates on the Apple's Support page.
- Learn more about how to update all Android apps automatically on Google Play Help.
How to manually update your mobile devices
- iOS devices can also be updated manually, which may be necessary if the auto update hasn't occurred yet. Learn more about manually updating your iOS device.
- Learn more checking and updating your Android app version.
Create a Blink account
To get started with the Blink app, follow the instructions below:
With Blink, you have one user account with one email and one phone number. On log in and certain other actions, a verification number is sent to the mobile number or email address of the account.
Note: If you want to share your account with other users, learn more about setting up a second phone or device.
- Launch the Blink App and tap Create Account at the bottom of the screen.
- Select your country from the drop-down menu and tap Next.
- Your region is pre-selected based on your IP address. Confirm your region and tap OK.
- Enter a valid email address, and tap Next.
- Create a password and tap Create Account. The password requirements are listed at the bottom of the screen. Tap the eyeball icon if you want to view what you are typing.
- Complete the multi-factor authentication (MFA) process. Learn more about multi-factor authentication.
Multi-factor authentication steps
Verify your email address
Enter the PIN from the email we sent you and tap Verify.
- PIN codes are valid for 40 minutes.
- If you haven't received the code after 90 seconds, tap Resend PIN Code.

Verify your phone number
Tap the phone number entry line to bring up a keypad.
Enter the phone number you wish to use for device verification and tap Next.
Optional: Select your country code by tapping the flag icon next to the phone number entry line.
If you prefer to not use SMS, the PIN code can be read to you by an automated voice call.
To choose this option, under Receive code by: select Voice call and tap Next.

A SMS text message containing the PIN code is sent to the phone number, and you are shown another PIN entry screen.
- Example SMS text Message:

Enter the PIN from the SMS text message we sent you and tap Verify.
- PIN codes are valid for 40 minutes.
- If you haven't received the code after 90 seconds, tap Resend PIN Code.

Link your Blink and Amazon accounts
When the phone verification step is complete, you are prompted to link your new Blink account to your Amazon account by tapping Link Accounts. If you don't want to link your account, select Skip to be sent to the Home screen without linking your accounts.

Note: This is an optional step, but we highly recommend linking your accounts at this time. Learn more about the benefits of linking your accounts.
Sign into your existing Amazon account. You will need to know your Amazon login email address and password. Once the link is established between accounts, tap Done.

Setting up your camera
Add your Mini camera to a new or existing system
Your Mini 2 first needs to be powered to be added to a system. Plug your supplied cable into the USB port in the back of the camera and the other end into your power supply. Then plug the power supply into your wall outlet. Once your Mini 2 is receiving power, proceed with the following steps.
1. On the Blink app Home screen, tap the + icon in the top right corner.
2. On Add Device, tap Mini Cameras. You will be asked to scan a QR Code which is located on the back of your Mini camera, above the plug socket. Your camera may request permission to scan the QR code. Otherwise, you can enter the number manually.
Note: If your camera can't correctly focus to scan the QR code, add more light to the scene either with the camera flash or room lighting.


3. Add your camera to an existing system or create a new system name if you'd like. When adding Mini to an existing system, tap the system name to continue.
Note: If you want to use your Mini camera as a doorbell chime, make sure it's added to the same system as your Blink Video Doorbell.

4. You will be instructed to plug in your camera and wait for the lights on the camera's face to appear. One will blink blue and another to be solid green. When this occurs, tap Discover device, and the following message appears: "Blink" Wants to Join Wi-Fi Network"BLINK-XXXX"? Tap Join. Learn more about the Blink Wi-Fi network.
Note: If you don't see a blinking blue light, you may need to reset the camera.


5. On the next screen, select your Wi-Fi network name.
If you're adding the camera to an existing system, be sure you choose the same Wi-Fi network that your other devices are connected to.

6. Once camera successfully connects to your network and reaches out to the Blink servers, your Mini is added. Tap Done to complete the setup and return to the app home screen.
Unable to Connect to Sync Module when adding cameras to a system? Learn more about what to do when you can't connect to the Sync Module when setting up devices.
Helpful tips
The following articles can guide you to enhance your Blink experience.
Mounting the camera
Use this article for understanding how to mount your Blink Mini camera.
How the mount attaches to the Mini
The Mini camera ships with an attached camera mount along with two screws in the box. Be sure to remove the clear protective film covering the lens prior to using the camera.
Depending on the orientation of where the camera will live, you will use one of the two mounting points:
- The vertical mounting point (for walls or other vertical surfaces) is located above the USB port at the rear of the camera.
- The horizontal mounting point (for flat surfaces and ceilings) is located at the bottom of the unit.
The Mini can also fit onto other standard Blink camera mounts.

Mounting the Blink Mini Camera
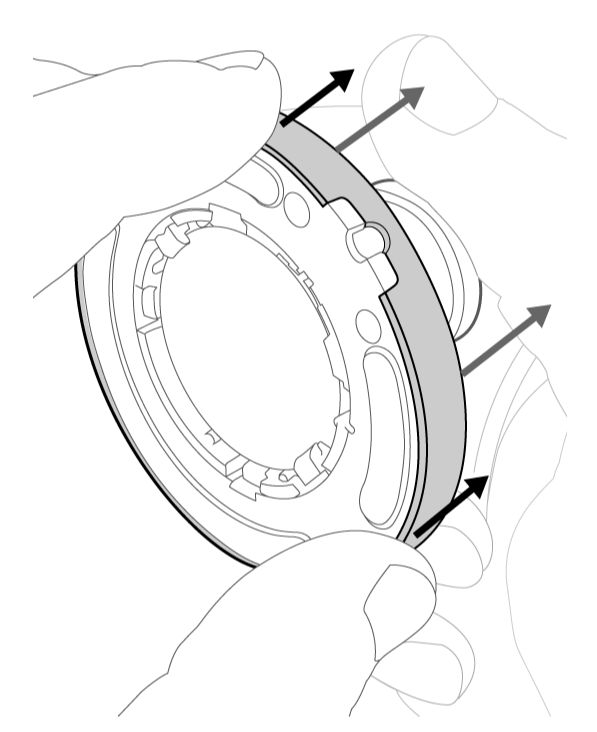
- Hold the camera and pull the mount from the camera. Put the camera in a safe place where the lens will not be scratched.
- While holding the mount in both hands, apply pressure to the outer ring while supporting the mount with the opposite hand.
- Select a location to mount your camera. When you've decided where it will go, use the included screws to secure the mount to your surface. Proper camera placement is important for good image quality. Mini cameras have been used to detect motion through glass. Remember, this is not the most accurate way to detect motion. When using your Mini through glass, be sure to turn off the Recording LED and the Night Vision IR LED to prevent glare from reflected light. Learn about camera placement.

- After the mount is secured, press the cable into the molded clips in the base.
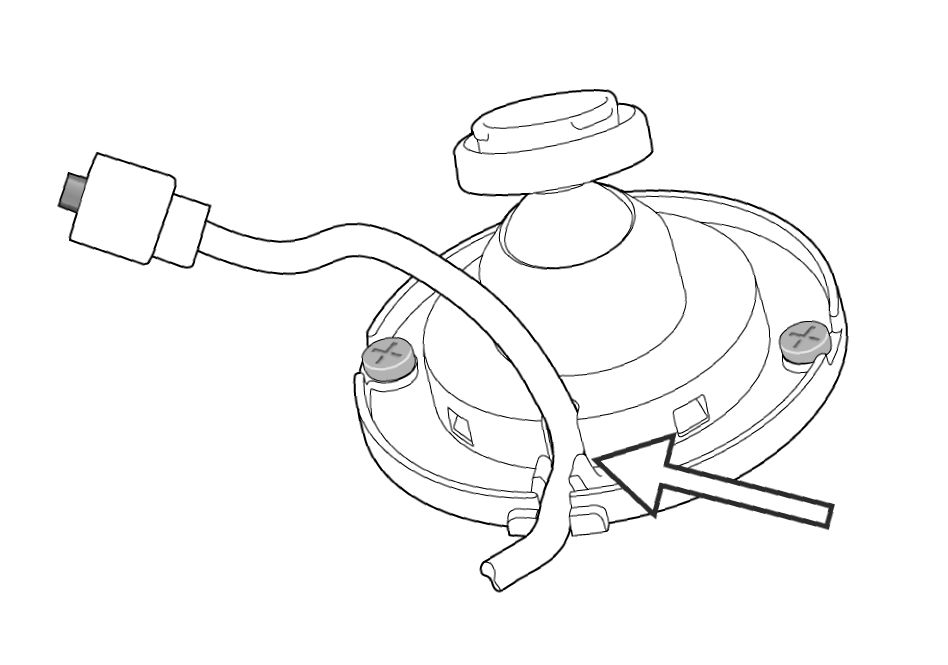
- Thread the cable end through the retaining ring, and line up the notch with the cable. Press all sides of the retaining ring to secure it in place.
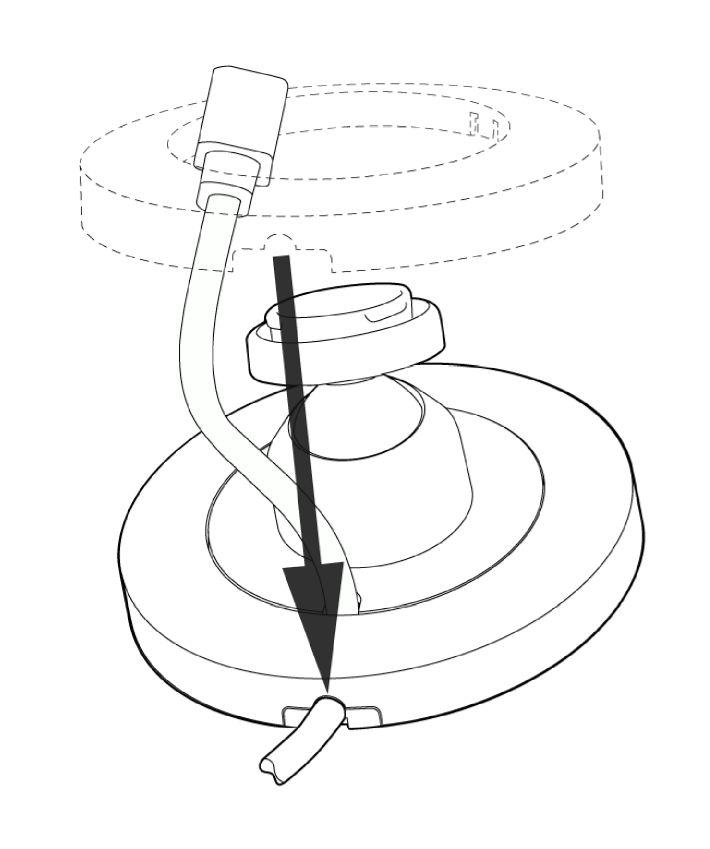
- Press the Mini onto the mounting point. It will click into place as the camera is secured.

- Plug the cable into the USB port in the back of the Mini and aim the camera.
- Plug other end of the cable into the power supply and then plug the power supply into your wall outlet.
You can test the camera's orientation by using Live View in the Blink app.
Note: The new Pan-Tilt Mount is designed exclusively for use with the Blink Mini camera and supports user-controlled pan-tilt functionality directly from the Blink app.
Optional: Flipping video
If you want to mount the Mini onto a ceiling or an overhead surface, you may need to flip the camera's video so it outputs properly. You can make this change in the Blink app under Device Settings, by tapping the More button  on your camera's thumbnail and select Device Settings
  in the lower right corner in the thumbnail image. Then select Video and Photo and tap Flip Video to turn on this setting.
Visit the camera settings page for more information about settings.
Name your camera and set the thumbnail
This articles describes how to change your camera name and refresh the thumbnail image.
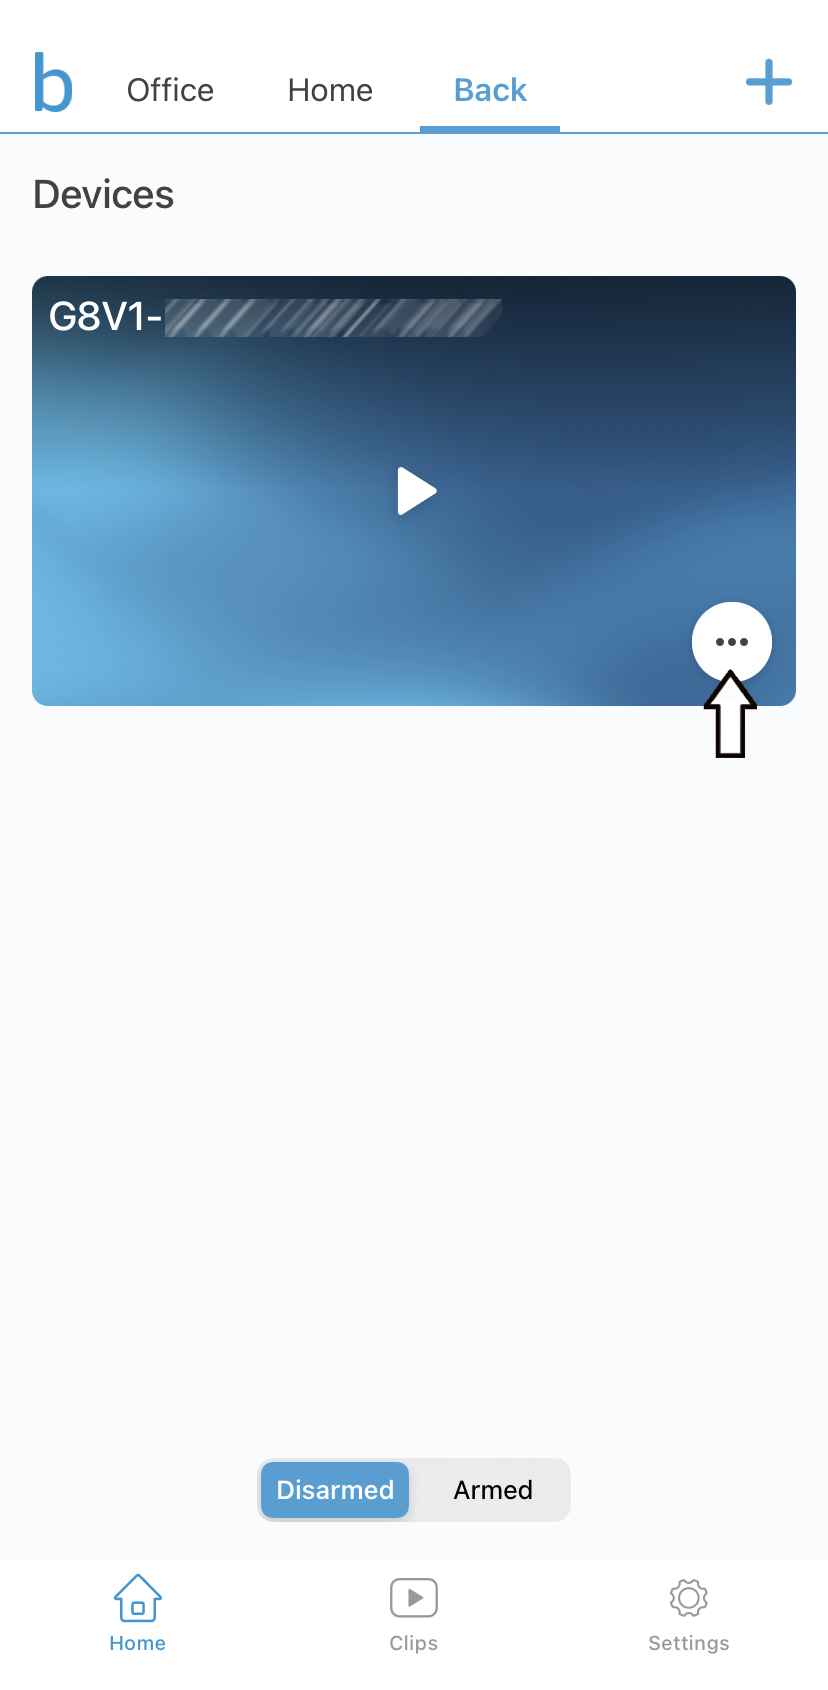
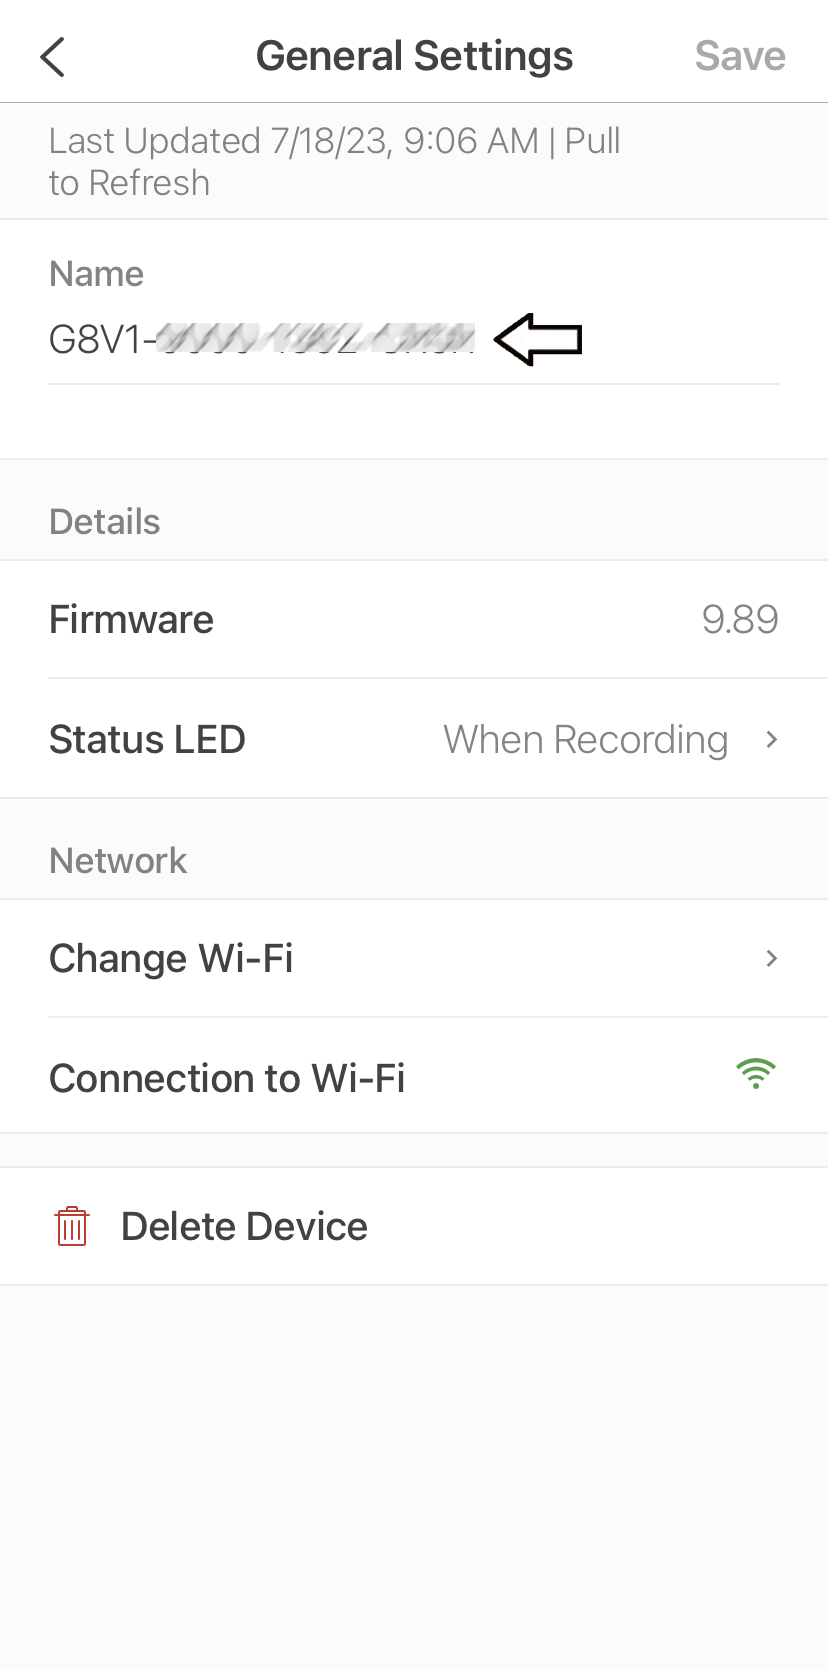
When you add a new camera, the camera name and image are not set up. Your camera's device serial number (DSN) displays as the camera name (shown below as G8V1-9000-1362-CR5R). The thumbnail image (your camera's view) will be blue. To change the name of your camera or add a thumbnail picture, follow the steps below.
Change the camera name
- To find Device Settings, tap the More button
 at the bottom right of the device's thumbnail image.
 - From the Device Setting screen, select General Settings.
- Next, tap the camera's name to enter the new name (for example, back porch). Once you enter the new camera name, tap Save.
Refresh thumbnail
From the Home Screen, tap the More button![]() and select Refresh Thumbnail. The camera takes a screenshot of the current live view and replaces the blue image with this screenshot. The thumbnail remains the same until you refresh it using Refresh Thumbnail. Learn more about using the Blink app.
and select Refresh Thumbnail. The camera takes a screenshot of the current live view and replaces the blue image with this screenshot. The thumbnail remains the same until you refresh it using Refresh Thumbnail. Learn more about using the Blink app.
Note: This process doesn't apply to the Video Doorbell when it's in Event Response Mode, since the thumbnail is updated automatically each time the doorbell ringer button is pressed or a motion event occurs. Learn more about Event Response Mode.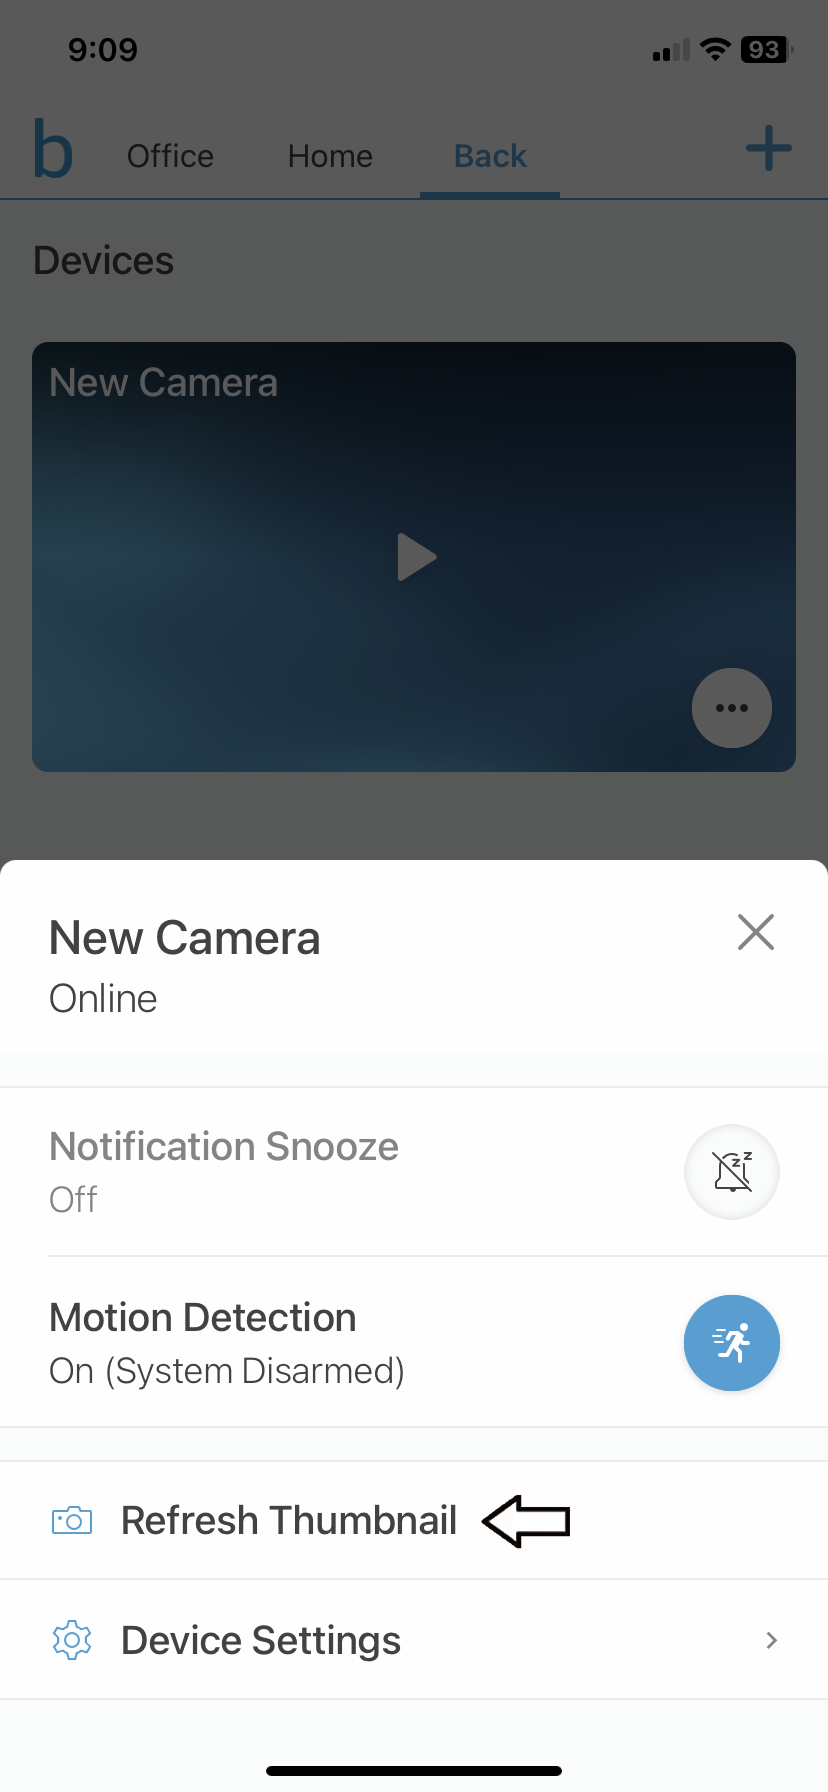
Camera Placement
Considerations for outdoor use
When placing a Blink camera outdoors, keep in mind that random objects, like cars or blowing leaves, and even moving shadows can trigger a motion alert. To reduce unwanted alerts, adjust the Sensitivity setting or use Motion Zones to block off certain areas of the view.
To preserve the privacy of others, you can use Privacy Zones that stop the camera from sending anything within the two areas you set.
When your camera has adjusted the white balance for darkness and motion has occurred, the scene may have an area of bright light. This image may be sent to you before the camera has adjusted itself. In this case, there may be a blue tint to the image; however, the next clip will have a corrected white balance. You can adjust the camera view to avoid areas of high contrast (morning sun on a dark walkway).
Considerations for indoor use
When placing your camera indoors, or in a garage, some surfaces can affect what you see. Flat surfaces reflect light and create glare. Momentary reflections, or a strong source of light aimed at the camera lens can also create a glare.
The appearance of glare will appear as fog or bright area of the image. Glare can also make the background appear darker. This image is from a camera sitting directly on a shelf.
![]()
Moving the camera a short distance away from a reflective surface can make a big difference. Using a Blink Camera Mount or Blink Camera Stand lifts the camera off of flat surfaces and improves image clarity. The image below is from the same camera on a mount.
![]()
In some cases, switching the infra red (IR) light Setting to Off can help reduce glare. If the area is lit when motion occurs, as with some garage doors or our floodlight products, your camera will provide a picture using visible light instead of IR, as shown below.
![]()
Considerations for motion detection
To detect motion, cameras other than the Mini are sensitive to the size of an object's heat as it appears in the view. The Blink Mini detects visual differences between one moment and the next. For both types of camera however, a small object close to the camera would trigger a detection equal to a larger object farther away because their appearance is similar in the camera view. The best range of detection is within 5 to 20 feet (about 1.5 to 6m) from the camera. By placing your camera higher off of the ground, you can avoid smaller animals causing motion alerts.
Mini cameras have been used to detect motion through glass. Remember, this is not the most accurate way to detect motion. When using your Mini through glass, be sure to turn off the Recording LED and the Night Vision IR LED to prevent glare from reflected light.
Because motion is detected by difference in the view, a person walking toward the camera is harder to detect than when they walk across the scene.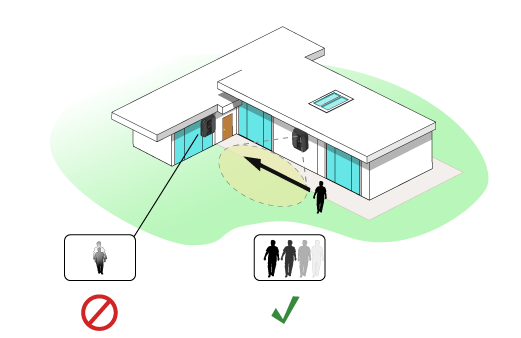
If you want to see arriving visitors and package deliveries, it may be useful to mount the camera looking towards the doorway, so random pedestrians or stray animals do not appear in the background and cause motion alerts that you are not interested in.
Where you place your Blink devices can affect your audio
Placing your camera near hard surfaces may produce unwanted sounds. Placing the camera on a shelf, near a wall, or set back from the edge, may create a "boxed-in" environment. Because a hard surface reflects sound, the camera microphone may pick up the original sound and the reflected sound.
For ideal placement, please avoid placing your camera:
- Near dense materials like brick, stone, concrete, metals
- Near other electronic devices
- In confined spaces
Use the Mini as a Video Doorbell Chime
If you use both a Blink Mini or Mini 2 cameras and a Blink Video Doorbell, your Mini can work as a chime. This is useful if you don't have a doorbell chime installed in your home.
How it works
When the doorbell's button is pressed, a chime will play from its speaker. The same chime sound plays from each Mini camera that you have connected.

Note: When your Mini is playing the chime sound, it will stop playing for any Mini-based event like recording a motion clip, or entering Live View.
Add your Mini and Doorbell to the same system
As long as the cameras are added to the same system, your Mini can act as a chime for one or more Blink Video Doorbells, or any combination of Blink Video Doorbells and Mini cameras.
| Blink device | How to add a Mini as a Chime |
| Sync Module 2 with a Blink Video Doorbell | Add a Blink Mini to the Sync Module system |
| Sync Module 2 with a Blink Mini Camera | Add a Blink Video Doorbell to the Sync Module system |
| Blink Video Doorbell only | Add a Blink Mini Camera to the Video Doorbell's system |
| Blink Mini Camera only | Add a Blink Video Doorbell to the Mini Camera's system |
Setting up a Mini as a Video Doorbell chime
- If you already have one or more Mini cameras on the same system as your doorbell, tap the More button located at the bottom-right corner of the doorbell's thumbnail to access Device Settings and select Doorbell and Chime Settings.
- Tap Use Blink Mini Camera as Chime.
- All Mini cameras that are on the same system as your doorbell will be displayed. If you don't see your Mini, see the troubleshooting tip below.
- Select one or more Mini cameras by tapping the circle to the right of the camera name. Once selected, a blue checkmark displays.
- Tap Save and your Mini camera(s) will chime when your Video Doorbell's button is pressed.
Event Response Mode
If your doorbell is in Event Response mode, you must press the doorbell's button to save changes to your doorbell's Settings.
Mini settings for the chime
Once your Mini and Video Doorbell are on the same system, you can control the chime volume by selecting the More button located at the bottom-right corner of the doorbell's thumbnail to access Device Settings. Then tap Audio Settings to adjust volume levels.
Speaker Volume: Adjust this slider to change the speaker volume of your camera.
Mini as a Chime Volume: Adjust this slider to change how loud your Mini camera's speaker will play the chime.
Troubleshooting
How do I add my Mini to my Video Doorbell system?
When you add a new Mini in the Blink app, you will be prompted to select your existing system or Create a new system. Tap your existing system and select the system that contains your Video Doorbell.
If you have already added your Mini in the Blink app:
- Delete the Mini from its current system. Learn more about how to delete a camera.
- Add the Mini again and tap your existing system and select the system containing your Video Doorbell.
What if I don't see my Mini?
Each Mini camera used as a chime must be on the same system as the doorbell. If you open the Doorbell and Chime Settings and do not see a Mini camera that you have added, the Mini may be in a different system. If you have multiple systems, they will be separated by gray tabs at the top of the home screen. If your Mini camera displays on the Blink app home screen, the system name is located in gray tab above it.
If you have already added your Mini in the Blink app:
- Delete the Mini from its current system. Learn more about how to delete a camera.
- Add the Mini again and tap your existing system and select the system containing your Video Doorbell.