Este artículo te explica cómo quitar la tapa trasera de los dispositivos Blink. Puedes quitarla para instalar las baterías o para encontrar el código QR de algunos dispositivos Blink.
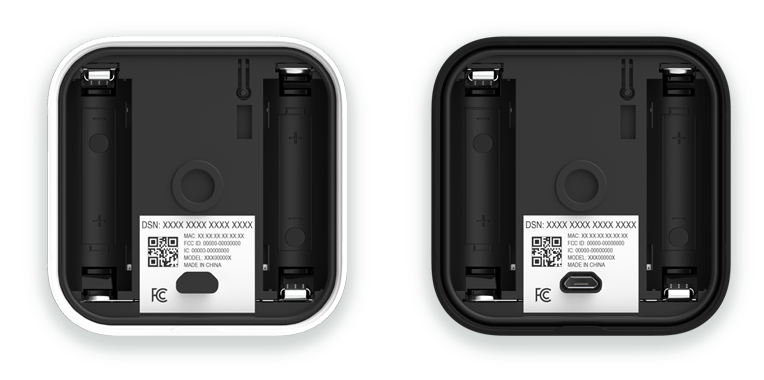
El código QR, que incluye el Número de Serie del Dispositivo (DSN), lo puedes encontrar en la parte trasera de algunos dispositivos Blink o dentro del dispositivo. También puedes encontrar el código QR en la guía de configuración que viene en el empaque.
Cómo quitar la cubierta posterior de las cámaras
Cámaras Outdoor
Este artículo describe cómo quitar la tapa trasera de la Outdoor 4 y sustituir las baterías.

*La Outdoor 4 puede ser alimentada a través de su puerto USB-C utilizando un adaptador USB-C resistente a la intemperie; sin embargo, una vez que se retira la tapa del puerto USB, la cámara deja de ser resistente a la intemperie hasta que se vuelva a insertar.
Cómo quitar la tapa trasera
Para quitar la tapa trasera de su cámara, usa la herramienta de apertura de ángulo recto/adaptador incluida o un destornillador grande.
1. Gira el tornillo hacia la izquierda (en sentido antihorario) hasta que gire libremente.

2. Usa la herramienta de apertura de ángulo recto/adaptador para hacer palanca suavemente en una dirección, levantando la tapa trasera.
Cómo instalar sus baterías
Una vez que hayas quitado la tapa trasera, inserta tus baterías con los polos positivo (+) y negativo (-) alineados dentro del compartimento de la batería.
Nota: Las cámaras Blink son compatibles únicamente con baterías de litio no recargables AA 1.5 voltios.
Cómo sustituir la tapa trasera
Para asegurarse de que la tapa trasera esté colocada correctamente, se incluye un poste en su diseño. La tapa trasera solo encaja cuando el poste está alineado con el orificio de la llave en la cámara.
1. Alinea el poste de la tapa trasera con el orificio de la llave junto al puerto USB de la cámara y presiona para cerrar.

2. Usa la herramienta de apertura de ángulo recto/adaptador, una moneda o un destornillador grande para girar el tornillo hacia la derecha (en sentido horario) unas tres vueltas hasta que la tapa trasera esté al ras con la cámara.
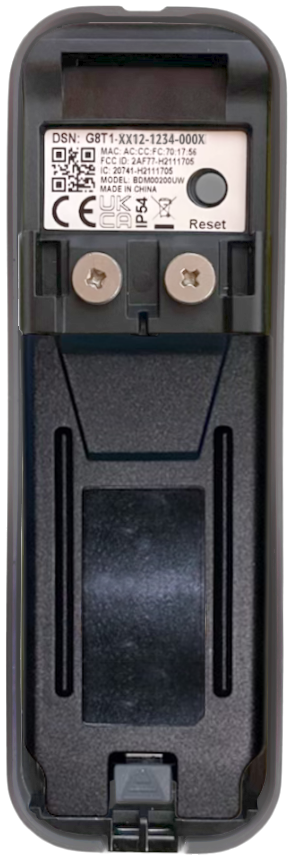
Video Doorbell
Este artículo describe cómo quitar la cubierta trasera e instalar o cambiar las baterías del Video Doorbell.
Antes de empezar
Llave de liberación
Localiza la llave de liberación que estaba pegada a la plantilla de papel en el embalaje del timbre. Si has perdido tu llave de liberación, por contacta con el Servicio de atención al cliente y te enviaremos una nueva.

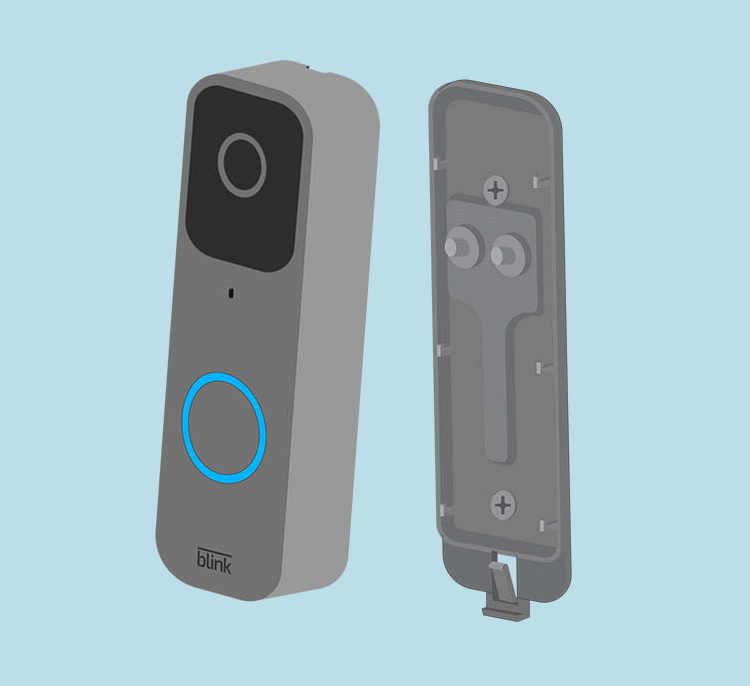
Quitar el timbre de la placa de montaje
- Presiona la llave de liberación directamente en la ranura en la parte inferior para soltar el enganche.
- Una vez liberado, tira del timbre para separarlo de la placa de montaje.

Quitar la cubierta trasera
- Para quitar la cubierta trasera, da la vuelta al timbre para que quedes mirando a la parte trasera (como se muestra a continuación).
- Con tu uña, levanta el pestillo gris en la parte inferior del timbre. Esto libera la cubierta resistente a la intemperie.
Nota: Guarda la cubierta en un lugar seguro mientras cambias las baterías.

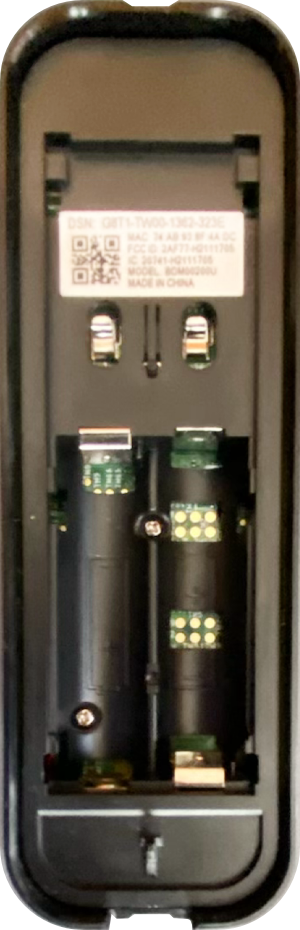
Instalar o cambiar las baterías
Una vez que hayas quitado la cubierta trasera, introduce las baterías de litio no recargables AA 1.5 voltios con los polos positivo (+) y negativo (-) alineados dentro del compartimento de la batería.
Sustituir la cubierta trasera
- Inserta las lengüetas en la parte superior de la puerta en las ranuras cerca de los tornillos terminales.
- Empuja la parte inferior de la cubierta trasera hasta que veas y escuches el clic del pestillo gris.
Volver a montar tu timbre
- Alinea la parte superior del timbre con la parte superior de la placa trasera para que el gancho se ajuste.
- Luego, pulsa firmemente la parte inferior del timbre contra la placa trasera hasta que sientas y escuches un clic.
- Si has desconectado la alimentación eléctrica de tu sistema de campanilla, vuelve a conectarla.
- Una vez montado de nuevo, pulsa el botón del timbre para probarlo.
Instrucciones para una placa trasera de 2 orificios
Si tu timbre tiene una placa trasera de 2 orificios, sigue estos pasos para sustituir tus baterías.
Quitar el timbre de la placa de montaje
- Presiona la llave de liberación directamente en la ranura en la parte inferior para soltar el enganche.
- Una vez liberado, tira del timbre para separarlo de la placa de montaje y desliza el timbre hacia arriba mientras lo alejas de la placa de montaje.
Reemplazar las baterías
Una vez que hayas quitado el timbre de la placa de montaje, da la vuelta a la cámara y reemplaza las baterías.
Volver a montar tu timbre
- Alinea la parte superior del timbre con la parte superior de la placa trasera para que el gancho se ajuste.
- Luego, pulsa firmemente la parte inferior del timbre contra la placa trasera hasta que sientas y escuches un clic.
- Si has desconectado la alimentación eléctrica de tu sistema de campanilla, vuelve a conectarla.
- Una vez montado de nuevo, pulsa el botón del timbre para probarlo.
Cámaras Outdoor e Indoor (3rd Gen)
Utiliza este artículo para obtener instrucciones sobre cómo quitar la tapa trasera e instalar las baterías en las cámaras Blink Outdoor e Indoor (3rd Gen).
Antes de empezar
Antes de intentar quitar la tapa trasera, asegúrate de que la cámara esté desconectada de cualquier soporte o accesorio. Esto incluye cualquier producto de terceros al que pueda estar conectado.
Si la cámara es nueva, una pegatina de plástico en la parte trasera de la cámara muestra la dirección en la que debes girar. Retira esta pegatina antes de usar la cámara.
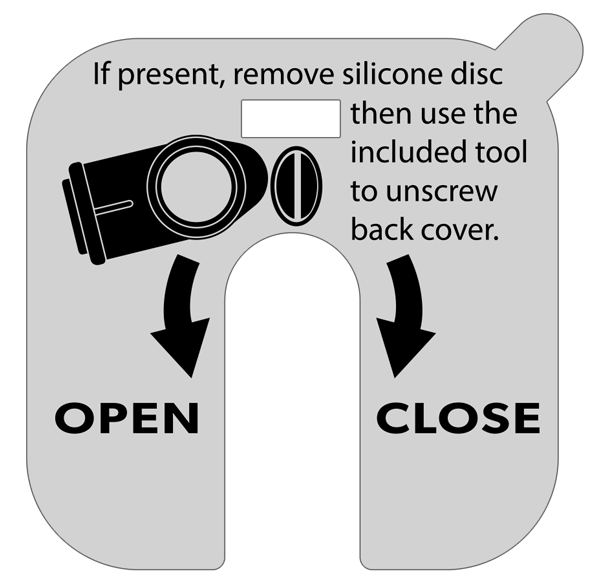
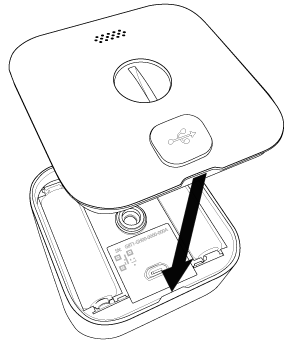
Retira la tapa posterior y abre la cámara:
- Si está presente, retire la tapa de protección de silicona del tornillo de fijación y guárdelo para un uso futuro.
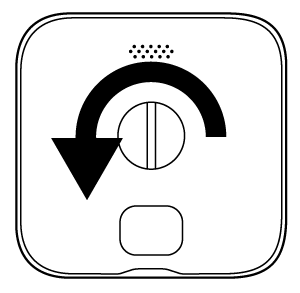
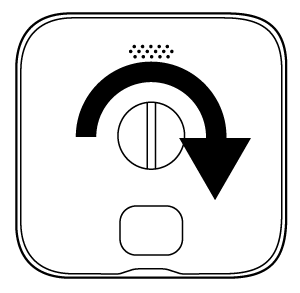
- Utiliza la herramienta de apertura incluida para girar el tornillo en sentido antihorario (girando a la izquierda) hasta que el tornillo gire libremente. Si la herramienta no está disponible, también se puede utilizar un objeto equivalente como una moneda o un destornillador de punta plana.

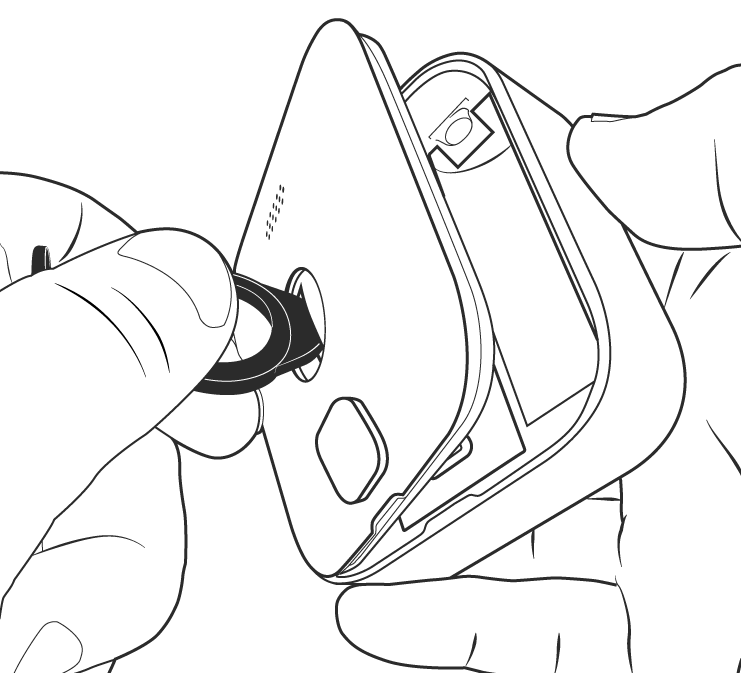
- Con la herramienta insertada en la ranura, aplica presión lateral sobre la herramienta y haz palanca suavemente para soltar la tapa. Como se muestra en la ilustración, sostén la cámara de lado con una mano mientras tiras con la otra mano.
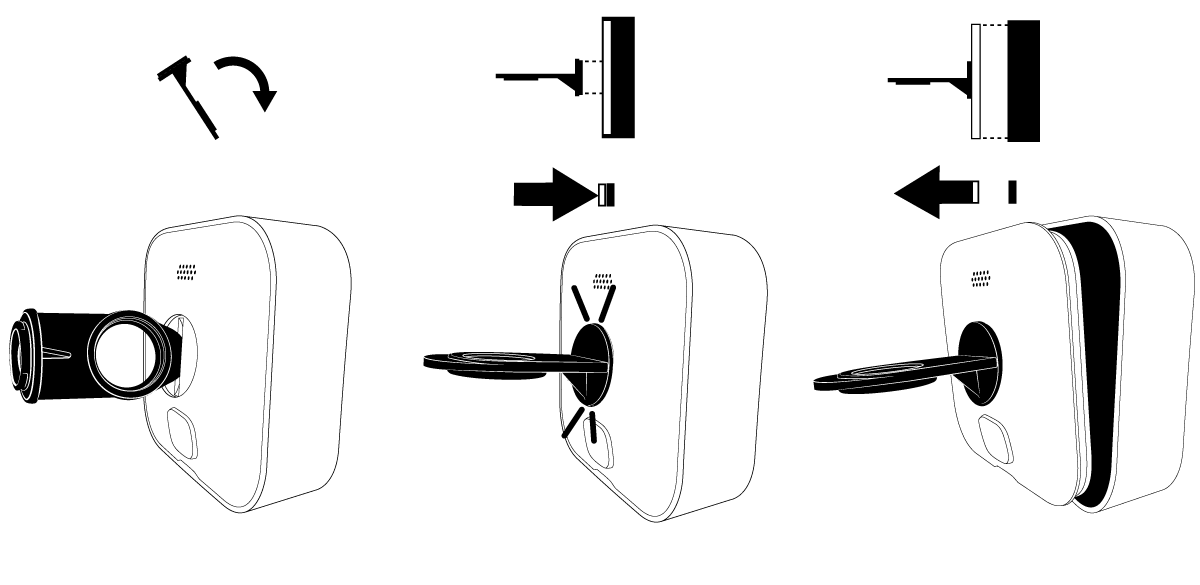
Instrucciones opcionales: Hay otra forma de quitar la tapa trasera.
- Después de haber desenroscado completamente el tornillo, gira la herramienta de apertura e inserta el extremo de montaje en el orificio de la tapa trasera de la cámara. Sentirás y escucharás un clic cuando la herramienta se haya fijado.
- Sostén la cámara con una mano y tira suavemente de la herramienta de apertura hacia atrás. Esto permitirá que la tapa trasera se desprenda.
Instalar o sustituir las baterías
Una vez que hayas quitado la tapa trasera, tendrás acceso al compartimento de las baterías. Añade o reemplaza las 2 baterías de litio AA en sus ranuras, haciendo coincidir los signos + y - etiquetados en la cámara con los signos + y - etiquetados en las baterías.
Reemplazar y fijar la tapa trasera
- Alinea las muescas de guía como se muestra y presiona la tapa nuevamente en su lugar contra el cuerpo de la cámara.
- Aprieta el tornillo a mano en sentido horario (girando a la derecha) hasta que esté ajustado. Ten cuidado de no apretar demasiado. La tapa debe quedar al ras con el cuerpo de la cámara cuando hayas terminado.
Cámaras XT2 y XT
Este artículo le mostrará cómo quitar la tapa de la batería de su cámara Blink XT .
1. Sostenga la cámara de manera que la parte posterior quede orientada hacia usted.
2. Verás un interruptor gris con una flecha que apunta hacia la parte inferior de la cámara. Deslízalo y mantenlo presionado en la dirección de la flecha.
3. Mientras haces esto, levanta la tapa de la batería con el pulgar. Es posible que tengas que hacer algo de fuerza, ya que la cámara es hermética.
4. Levante la tapa de la batería de la cámara.
Eso es todo, ahora puedes insertar las baterías y acceder al Número de serie del dispositivo (DSN) de tu cámara.
Cámara Indoor (1.ª generación)
El pestillo para quitar la tapa posterior de la cámara Indoor (1.ª generación) se encuentra en la parte inferior. Deslice el pestillo para liberar la tapa de la batería.