Utilizza questo articolo per aiutarti a configurare il tuo Video Doorbell .
Istruzioni di installazione
1. Scarica l' Blink app e crea un account
Se hai già un account Blink , vai al passaggio successivo.
Crea un account Blink con l' Blink app
Se è la prima volta che usi Blink, comincia scaricando l'app Blink. Una volta installata l'app, puoi procedere con la creazione di un account Blink.
Creare un account Blink
Con Blink, hai un unico account Blink con un unico indirizzo e-mail e numero di telefono. Al momento dell'accesso e di alcune altre operazioni, viene inviato un numero di verifica al numero di telefono o all'indirizzo e-mail associato all'account.
Nota: se desideri condividere il tuo account con altri utenti, scopri come configurare un secondo telefono o dispositivo.
Per iniziare a utilizzare l'app Blink:
- Avvia l'app Blink e tocca Crea account nella parte inferiore dello schermo.
- Seleziona il tuo paese nel menu a discesa e tocca Avanti.
- L'area geografica viene preselezionata in base all'indirizzo IP. Conferma l'area geografica e tocca OK.
- Inserisci un indirizzo e-mail valido e tocca Avanti.
- Crea una password e tocca Crea account. I requisiti per la password sono elencati in fondo alla schermata. Tocca l'icona dell’occhio per visualizzare ciò che stai digitando.
- Inserisci il codice di verifica a 6 cifre ricevuto via e-mail, quindi tocca Verifica.
- Aggiungi un numero di telefono per abilitare l'autenticazione a più fattori (MFA). Scegli di ricevere i codici di verifica tramite SMS o chiamata vocale. Tocca Avanti.
- Inserisci il codice di verifica a 6 cifre ricevuto tramite SMS/chiamata vocale, quindi tocca Verifica. Se non ricevi un codice di verifica, attendi 90 secondi e tocca Rinvia codice. Se la verifica non riesce, tocca Riprova.
- Tocca Accetta e continua per collegare gli account Amazon e Blink, oppure tocca Ignora in alto a destra per saltare questo passaggio.
Dopo aver completato tutti i passaggi richiesti, accedi al tuo account Blink. In caso di problemi o se hai bisogno di assistenza per la creazione di un account, contatta l’assistenza Blink.
Accesso all'app Blink
Per accedere all'app Blink:
- Apri l'app Blink.
- Tocca Accedi.
- Inserisci il tuo indirizzo e-mail e tocca Continua. Se hai dimenticato la password, tocca Hai dimenticato la password?
- Inserisci la password e tocca Accedi. Se il controllo di sicurezza rileva che la password è stata compromessa, ti verrà richiesto di cambiarla.
- Inserisci il codice di verifica a 6 cifre ricevuto tramite SMS/chiamata vocale o e-mail, quindi tocca Verifica codice. Se non ricevi un codice di verifica, attendi 90 secondi e tocca Rinvia codice. Se la verifica non riesce, tocca Riprova.
- Per escludere la verifica quando accedi con questo dispositivo per i successivi 30 giorni, seleziona Considera questo dispositivo attendibile (fino a 30 giorni).
- Se richiesto, imposta la Verifica in due passaggi, quindi tocca Avanti. Per saperne di più, visita Proteggi il tuo account Blink con l'autenticazione a più fattori.
Completata la verifica, avrai accesso al tuo account Blink. Se riscontri problemi durante il tentativo di accesso, consulta Risoluzione dei problemi di accesso all'account Blink.
2. Facoltativo: aggiungi il tuo Sync Module
Se hai già aggiunto un Sync Module al tuo sistema, vai al passaggio successivo.
Come installare un Sync Module
Blink consiglia di utilizzare il videocitofono con un Sync Module per un'esperienza ottimale. È importante aggiungere prima il Sync Module al sistema e poi aggiungere il dispositivo. Assicurati di installare il Sync Module vicino al punto in cui monterai il campanello, per un'installazione più affidabile di entrambi i dispositivi.
Dopo l'installazione, puoi usare l'indicatore di potenza del segnale Blink app per scegliere una posizione in cui spostare il Sync Module .
Aggiungi un Sync Module e crea un sistema
- Dalla schermata Home, tocca l'icona + per aggiungere un dispositivo.
- Nella schermata Aggiungi dispositivo, tocca Sync Module.
- Scansiona il codice QR sul retro del Sync Module o inserisci manualmente il numero di serie del Sync Module.
- Nota: l' Blink app potrebbe richiedere l'autorizzazione per accedere alla fotocamera del tuo dispositivo mobile per scansionare il codice QR. Se richiesto, seleziona Consenti.
- Una volta riconosciuto il numero di serie, viene richiesto di creare un nuovo sistema. Tocca la casella di immissione testo e fornisci un nome univoco per il tuo sistema. Se disponi di altri sistemi esistenti, questo nome deve essere diverso dagli altri nomi di sistema che potresti avere nel tuo account Blink. Tocca Continua dopo aver inserito il nuovo nome del sistema.
- IL La schermata Aggiungi Sync Module ti chiederà di collegare il Sync Module e quindi attendere la sequenza di luci blu lampeggiante e verde fissa. Tocca Scopri dispositivoquando vedi questa sequenza sul Sync Module.
- Nota: se non vedi la sequenza di luci blu lampeggianti, potrebbe essere necessario reimpostare il Sync Module. Ulteriori informazioni su come reimpostare il Sync Module.
- Per connettersi alla tua rete, l' Blink app utilizza il tuo dispositivo mobile per connettersi prima alla rete Wi-Fi temporanea del Sync Module. Si chiama "BLINK-_ _ _ _" dove le ultime 4 cifre provengono dal numero di serie del Sync Module. Tocca Unisci.
- Una volta completata l'iscrizione, ti verrà chiesto di connetterti alla tua rete Wi-Fi locale. Inserisci la password Wi-Fi e tocca Partecipa.
- La schermata Aggiungi Sync Module visualizza le reti Wi-Fi a 2,4 GHz nel raggio d'azione. Se non vedi la tua rete Wi-Fi locale, tocca Aggiorna elenco nella parte inferiore dello schermo. Il Sync Module memorizza le informazioni di rete per i dispositivi aggiunti al suo sistema. Ulteriori informazioni su come risolvere i problemi relativi alle connessioni Wi-Fi.
- Una volta aggiunto il Sync Module al nuovo sistema, riceverai una schermata di completamento. Tocca Fine per completare il processo. Ora sei pronto per aggiungere la tua nuova fotocamera. Il nuovo nome del sistema viene visualizzato nella parte superiore della schermata Home e vedrai anche il Sync Module. Un'icona a forma di nuvola con una linea di connessione verde indica che il Sync Module sta comunicando correttamente con i server Blink.
3. Determina come verrà installato il tuo Blink Video Doorbell .
Opzioni di installazione per il Blink Video Doorbell
Opzioni di installazione Blink Video Doorbell
Il Blink Video Doorbell può essere installato in tre modi.
Installazione cablata
Il Video Doorbell è alimentato da due batterie al litio non ricaricabili formato AA da 1,5 volt.
Offre alimentazione supplementare, collegamento al campanello meccanico o digitale di casa e maggiore durata della batteria.
Collega un Sync Module per aumentare la durata della batteria fino a 2 anni di normale funzionamento.
Questo tipo di installazione, abbinato a un piano di abbonamento Blink , consente la piena funzionalità del Blink Video Doorbell .
Installazione senza fili
Il Video Doorbell è alimentato da due batterie al litio non ricaricabili formato AA da 1,5 volt.
Consente al campanello di funzionare senza fili e di utilizzare esclusivamente l'alimentazione a batteria.
Collegando un Sync Module 2 si aumenta la durata della batteria fino a 2 anni di normale funzionamento.
Questo tipo di installazione, abbinato a un piano di abbonamento Blink , consente la piena funzionalità, ma non sarà in grado di far suonare un campanello interno.
Event Response
Il Video Doorbell è alimentato da due batterie al litio non ricaricabili formato AA da 1,5 volt.
In questa configurazione, il Video Doorbell si connette al Wi-Fi, ma non a un Sync Module o al cablaggio del campanello esistente.
Ricevi avvisi di movimento e notifiche quando premi il pulsante del campanello e tocca entro 60 secondi per aprire una sessione Live View con audio bidirezionale nell'app Blink app .
Le altre funzionalità sono limitate a causa della conservazione della durata della batteria.
Scopri di più su Event Response .
4. Aggiungi il tuo Video Doorbell
- Installare 2 batterie AA al litio non ricaricabili da 1,5 volt.
- Nell'app Blink app , tocca Aggiungi dispositivo + in alto a destra della schermata iniziale.
- Scansiona il codice QR del campanello.
- Scegli un sistema o creane uno nuovo se necessario.
- Collega l'app alla rete "BLINK" del tuo campanello e poi alla tua rete Wi-Fi.
- Per completare la configurazione, seguire le istruzioni rimanenti nell'app.
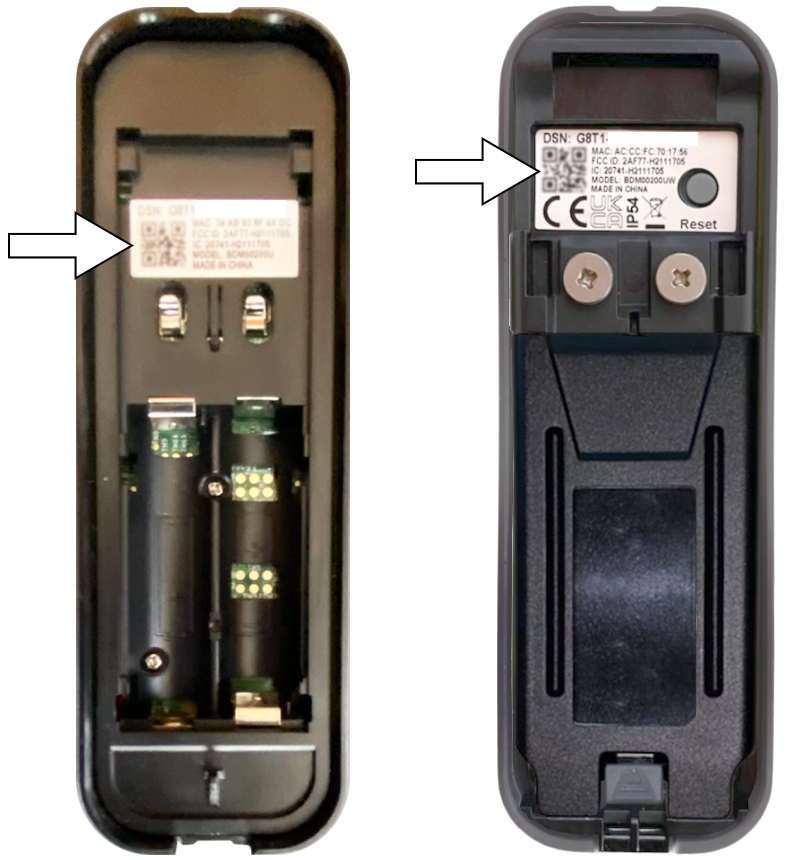
Dov'è il codice QR del campanello?
Il campanello Blink ha un codice QR nel vano batteria che rappresenta il numero di serie del dispositivo (DSN).
5. Montaggio del Video Doorbell
Tocca il pulsante a seconda di come vuoi montare il campanello e segui i passaggi di conseguenza. Altrimenti, tocca Forse più tardi per saltare queste istruzioni e completare l'installazione.
L'app ti fornirà istruzioni dettagliate su come montare il tuo campanello. Per maggiori informazioni sul montaggio, scopri di più su Montaggio del Blink Video Doorbell .
Istruzioni dell'app per il montaggio
Se scegli di montare il campanello in un secondo momento, puoi trovare le istruzioni di montaggio all'interno dell'app.
- Tocca altro (...) e seleziona Impostazioni dispositivo
 .
.
- Tocca Campanello e Suoneria.
- Scegli la tua configurazione. Tocca Monta con cablaggio o Monta senza cablaggio.
6. Passaggi finali
Congratulazioni, hai completato l'aggiunta del campanello al tuo sistema Blink !
Restano ancora alcuni passaggi facoltativi da completare.
Impostazione del nome e della miniatura della fotocamera
In questo articolo viene descritto come modificare il nome della fotocamera e aggiornare l'immagine in miniatura.
Quando aggiungi una nuova telecamera, il nome e l'immagine della telecamera non vengono impostati. Il numero di serie del dispositivo (DSN) della telecamera viene visualizzato come nome della telecamera. L'immagine in miniatura (la vista della telecamera) sarà blu. Per cambiare il nome della telecamera o aggiungere un'immagine in miniatura, segui i passaggi sottostanti.
Cambia il nome della telecamera
- Per trovare Impostazioni dispositivo , tocca il pulsante Altro (...) in basso a destra dell'immagine in miniatura del dispositivo.
- Dalla schermata Impostazioni dispositivo, selezionare Impostazioni generali.
- Prossimo, tocca il nome della telecamera per immettere il nuovo nome (ad esempio, veranda posteriore). Una volta immesso il nuovo nome della telecamera, tocca Salva .
Nota : quando aggiorni il nome della tua videocamera, le clip registrate prima della modifica del nome appariranno nell'elenco delle clip con il nome precedente.
Aggiorna miniatura
Dalla schermata iniziale , tocca il pulsante Altro (...) e seleziona Aggiorna miniatura . La telecamera cattura uno screenshot della visualizzazione live corrente e sostituisce l'immagine blu con questo screenshot. La miniatura rimane la stessa finché non la aggiorni usando Aggiorna miniatura . Il timestamp nell'angolo in basso a sinistra della miniatura mostra quando la miniatura è stata aggiornata l'ultima volta. Scopri di più sull'utilizzo dell'app Blink app .
Nota : questo processo non si applica al Video Doorbell quando è in modalità Event Response , poiché la miniatura viene aggiornata automaticamente ogni volta che si preme il pulsante del campanello o si verifica un evento di movimento. Scopri di più sulla modalità Event Response .
Aggiornamento automatico miniatura
La funzione Auto-Update Thumbnail ti consente di aggiornare la tua miniatura nella schermata Home nell'app Blink app , con ogni evento di movimento della telecamera o pressione del campanello. L'aggiornamento automatico della miniatura ti fornisce informazioni sulle ultime attività sulla tua telecamera. Anche se sposti la telecamera, l' Blink app catturerà automaticamente una nuova miniatura, così puoi identificare facilmente la posizione di ogni telecamera. Guarda cosa sta succedendo a colpo d'occhio, direttamente sulla tua schermata Home.
La miniatura di aggiornamento automatico è disponibile quando si verifica quanto segue:
- Un abbonamento Blink Basic, Plus Plan o di prova attivo.
- Mini 2 , Mini , Outdoor 4, Wired Floodlight , Video Doorbell , telecamere Indoor ed Outdoor (3rd Gen) .
Scopri di più sui piani di abbonamento e sulle funzionalità Blink .
Impostazione miniatura aggiornamento automatico
Quando aggiungi una nuova telecamera idonea (come elencato sopra) al tuo sistema, Auto-Update Thumbnail è abilitato per impostazione predefinita. Tuttavia, questa funzionalità è inizialmente disattivata per tutte le telecamere idonee che erano già sul tuo sistema. Auto-Update Thumbnail può essere attivato o disattivato utilizzando i seguenti passaggi.
- Tocca il pulsante Altro (...) nell'angolo in basso a destra nell'immagine in miniatura della fotocamera nella schermata iniziale.
- Tocca Impostazioni dispositivo.
- Quindi, seleziona Impostazioni video e foto. L'impostazione Aggiornamento automatico miniatura appare nella parte inferiore dello schermo, che può essere attivata o disattivata per quel dispositivo.
Quando hai abilitato l'aggiornamento automatico delle miniature, hai anche la possibilità di impostare manualmente la tua miniatura per tutti i dispositivi sul tuo account. Il timestamp nell'angolo in basso a sinistra della miniatura mostra quando la miniatura è stata aggiornata l'ultima volta. Scopri di più su come impostare manualmente la tua miniatura .
Consigli utili
Se il tuo campanello non viene trovato, appare una schermata di errore e ti viene chiesto di riprovare. Tocca Riprova.
Il campanello ti avvisa che è pronto per essere aggiunto quando l'anello attorno al pulsante del campanello emette un LED rosso lampeggiante.
Esistono due modi per resettare il campanello.
- Rimuovere le batterie : rimuovere le batterie per cinque secondi, sostituirle, quindi attendere che il LED rosso lampeggi.
- Reimpostare il campanello : tenere premuto il pulsante di reset con le batterie inserite (situato sul retro del campanello) finché la luce rossa non lampeggia.
Impostazioni del dispositivo
Utilizza Impostazioni dispositivo per apportare altre modifiche al campanello, ad esempio regolare il volume del segnale acustico, la sensibilità del rilevamento del movimento e il volume dell'altoparlante.
Dalla schermata Home sulla miniatura del campanello, tocca Altro (...) e seleziona Impostazioni dispositivo Scopri di più su come regolare le impostazioni del dispositivo.
Se non vedi le luci LED e sei sicuro che le batterie sono nuove, contatta l'assistenza clienti .