Use this guide to set up the XT and XT2 cameras.
Note: The XT and XT2 cameras require a Sync Module (sold separately) and also connect to your home Wi-Fi network.
Getting Started
New to Blink? If so, welcome! Follow the next steps to create a Blink account. If you already have a Blink account, please go to the Setting up your new camera section.
Create an account with the Blink app
If you're new to Blink, begin by downloading the Blink app. Once you have installed the app, you can proceed with creating an account.
Creating a Blink account
With Blink, you have one user account with one email address and phone number. Upon login and certain other actions, a verification number is sent to the mobile number or email address associated with the account. Learn more about setting up a second phone or device.
To get started with the Blink app:
- Open the Blink app and tap Create Account at the bottom of the screen.
- Select your country. Your country is pre-selected based on your IP address. To change it, tap Country, select from the list, then tap Save and Continue.
- Select your county (If applicable). Tap County, select from the list, then tap Save and Continue.
- Enter a valid email address, and tap Next.
- Create a password and tap Create Account. The password requirements are listed at the bottom of the screen. Tap the eye icon to display what you are typing.
- Enter the 6-digit verification code sent to your email, then tap Verify.
- Add a phone number to enable multi-factor authentication (MFA). Choose to receive verification codes via text or voice call. Tap Next.
- Enter the 6-digit verification code you received via text message (SMS) or voice call, then tap Verify (if you don't receive a code, wait 90 seconds and tap Resend Code; if verification fails, tap Try Again).
- Tap Continue to set up your location.
- Either manually enter your address, or select Use my current location.
Note: You may be prompted to grant app permissions to access your location and verify the address on your account. - After entering and verifying your address, tap Save Location.
- Tap Agree and Continue to link your Amazon and Blink accounts, or tap Skip in the top right to bypass this step.
After successfully completing all required steps, you'll be logged in to your Blink account. If you experience issues or require assistance in creating an account, contact Blink Support.
Signing into the Blink app
To sign in to the Blink app:
- Open the Blink app.
- Tap Sign In.
- Enter your email address and tap Continue. If you forgot your password, tap Forgot your password?
- Enter your password and tap Sign In. If a security check identifies your password as compromised, you will be prompted to change it.
- Enter the 6-digit verification code you received via text message (SMS), WhatsApp message, or voice call, then tap Verify (if you don't receive a code, wait 90 seconds and tap Resend Code; if verification fails, tap Try Again).
- To bypass verification when you log in using this device, select Trust this device (up to 30 days).
- If prompted, set up Two-Step Verification, then tap Next. To learn more, visit Securing your Blink Account with Multi-Factor Authentication.
After successful verification, you'll be logged in to your Blink account. If you encounter issues during the sign-in process, please refer to Troubleshooting Blink Account Login Issues.
Setting up your new camera
Add a Sync Module and create a system
Add a Sync Module and create a system
- From the Home screen, tap the + icon to add a device.
- On the Add Device screen, tap Sync Module.
- Scan the QR code on the back of the Sync Module or enter your Sync Module's serial number manually.
- Note: The Blink app may ask permission to access the camera on your mobile device in order to scan the QR code. If it asks, select Allow.
- Once the serial number is recognized, you are asked to create a new system. Tap the text entry box and provide a unique name for your system. If you have other existing systems, this name must be different from other system names you may have in your Blink account. Tap Continue after your new system name is entered.
- The Add Sync Module screen will instruct you to plug in your Sync Module and then wait for the light pattern of blinking blue and steady green. Tap Discover Device when you see this pattern on your Sync Module.
- Note: If you don't see the blinking blue light pattern, then you may need to reset the Sync Module. Learn more about how to reset the Sync Module.
- In order to connect to your network, the Blink app uses your mobile device to first connect to the Sync Module's temporary Wi-Fi network. It's named “BLINK-_ _ _ _" where the last 4 digits are from your Sync Module's serial number. Tap Join.
- After joining is successful, you are asked to join your local Wi-Fi network. Enter the Wi-Fi password and tap Join.
- The Add Sync Module screen displays 2.4 GHz Wi-Fi networks within range. If you do not see your local Wi-Fi network, tap Refresh List at the bottom of the screen. The Sync Module stores network information for devices that are added to its system. Learn more about how to troubleshoot Wi-Fi connections.
- When your Sync Module has been added to your new system, you will receive a completion screen. Tap Done to finish the process. You're now ready to add your new camera. The new system name displays at the top of your Home screen and you will also see the Sync Module. A cloud icon with a green connection line shows the Sync Module is successfully communicating with the Blink servers.
Remove the back cover and install batteries
This article will show you how to remove the battery cover from your Blink XT2 camera.
1. Hold the camera so that the back is facing you.
2. You'll notice a grey switch with an arrow facing toward the bottom of the camera. Slide and hold that in the direction of the arrow.
3. While doing this, pull up on the battery cover with your thumb. This may require some force as the camera is air tight.
4. Lift the battery cover off of the camera.
That's it, you can now insert the batteries.
Add one or more cameras
- From the Home screen, tap Add Device +.
- The Add Device screen displays the devices you can add to your system.
The Wired Floodlight, Mini, and Video Doorbell do not require a Sync Module; however, they can be added to a Sync Module system. Tap your device to continue the setup process. - On the Scan QR Code screen, use your mobile phone or device's camera to scan the QR code.
You may be prompted to allow the Blink app to access your mobile phone or device's camera. Scanning the QR code is the only time Blink will access the camera on your mobile device. If you prefer to not use your device camera, or if your camera is unable capture the QR code, tap Enter Serial Manually and manually enter the DSN. - When the serial number is accepted as valid, the setup process begins and you are shown the Camera Added screen with tips on camera placement. When setup is complete, a notification appears and you can tap Done.
Optional: Linking accounts
If your Blink and Amazon accounts are not already linked, you are asked to link them by tapping on the Link Accounts button. You should link accounts to take full advantage of subscription features.
Note: You also have the option to select Skip which sends you to the home screen without linking your accounts. Learn how to link your Blink and Amazon accounts later.
The Link Accounts screen asks you to sign into your Amazon account, or create a new one if needed. When the "Success! Accounts linked." message appears, tap Next to go to the Home screen.Delete- Congratulations, your camera has been added to the account. The Home screen shows a blank thumbnail and the serial number as its camera name.
Helpful tips
The following articles can guide you to enhance your Blink experience.
Mounting the camera
This article will show you how to mount your new Blink XT2 camera.
Your Blink XT2 comes with a camera mount, mount riser and two screws in the box. If you’d like to order more, you may do so at Amazon.com.
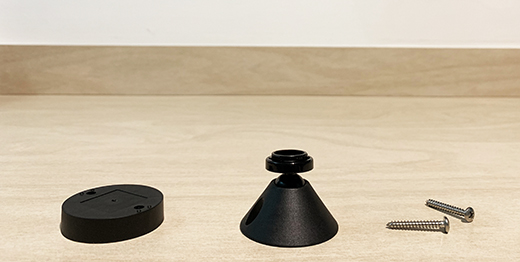
The mount riser is used to increase the distance from the mounting surface to the camera, allowing for a wider range of motion when positioning the camera. The two provided screws are wood screws. If you’re attempting to mount onto a different surface or any type of masonry, consult your local hardware store on the proper screw type.
We recommend holding the camera where you want to mount it, and try a Live View by pressing this icon in the app. This way, you can verify the camera has a good view and good signal strength in that location. The best motion detection occurs when a subject walks across the field of view horizontally rather than directly towards or away from the camera. Please keep this in mind when choosing a mounting location.
Once you’ve decided on a location, put the mount and the riser together. (Using the mount riser is completely optional)

You’ll see that the screw holes line up on these two accessories. Next, use the two provided screws to attach the mount at your desired location. Please note, use of the included screws for the mount will create two holes in the surface of the wall.

Once the mount (and optional mount riser) is securely in place, snap the camera onto the mount. The circle portion of the mount connects to the centre circle on the back of the XT2 camera.
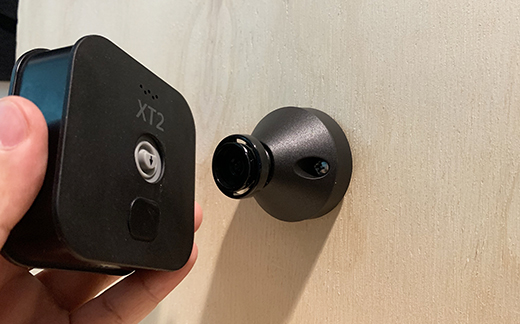
Once mounted, you can rotate the camera on the mount itself to get the perfect viewing angle. When positioning your camera, remember the best motion detection occurs when a subject walks across the field of view from one side to another rather than directly towards or away from the camera.
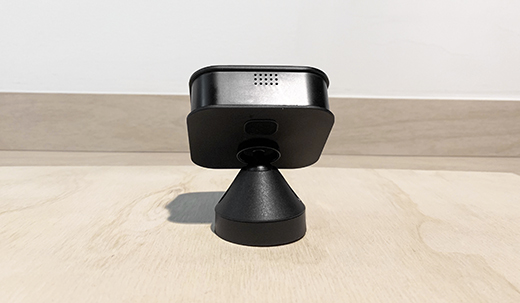
Other examples:


Name your camera and set the thumbnail
When you first set up your Blink camera, the default name includes the model and last four digits of its serial number (for example, ‘Mini 2 - XXXX’), and the thumbnail (camera view) appears as a default image. You can personalise the camera name and thumbnail to better identify your camera's location and view. Customise the following settings at any time.
Changing your camera's name
- Tap the More button (...) in the lower-right corner of the device thumbnail image.
- Tap Device Settings.
- Tap General Settings.
- Tap the camera's current name, enter a new name (such as Back Door) and tap Save. Your new camera name now displays.
Important: When you update the name of your camera, clips recorded prior to the name change will appear in your Clip List as that previous name.
Refresh thumbnail
From the Home screen, tap the More button (...) and select Refresh Thumbnail. The camera takes a screenshot of the current live view and replaces the blue image with this screenshot. The thumbnail remains the same until you refresh it using Refresh Thumbnail. The timestamp in the lower-left corner of the thumbnail shows when the thumbnail was last updated. Learn more about using the Blink app.
Note: This process doesn't apply to the Video Doorbell (1st Gen) when it's in Event Response Mode, since the thumbnail is updated automatically each time the doorbell ringer button is pressed or a motion event occurs. Learn more about Event Response Mode.
Auto-Update Thumbnail
The Auto-Update Thumbnail feature allows you to refresh your thumbnail image on the Home screen in the Blink app with each camera motion event, doorbell press or Live View session. Updating the thumbnail automatically provides you with information about the latest activity on your camera. Even if you move your camera, the Blink app will automatically capture a new thumbnail image, so you can easily identify each camera’s location. See what’s happening at a glance, right on your Home screen.
The Auto-Update Thumbnail is available when you have the following:
- An active Blink Subscription Plan or no-cost trial.
- Mini 2, Mini, Outdoor 4, Wired Floodlight, Video Doorbell, Indoor and Outdoor (3rd Gen) cameras.
Learn more about Blink Subscription Plans and features.
Setting up Auto-Update Thumbnail
When you add a new eligible camera (as listed above) to your system, Auto-Update Thumbnail is enabled by default. However, this feature is initially turned off for any eligible cameras that were already in your system. Auto-Update Thumbnail can be turned on or off using the following steps.
- Tap the More button (...) in the lower-right corner in the thumbnail image for your camera on the Home screen.
- Tap Device Settings.
- Next, select Video and Photo Settings. The Auto-Update Thumbnail setting appears at the bottom of the screen, which can be toggled on or off for that device.
When you have Auto-Update Thumbnail enabled, you also have the option of manually setting your thumbnail for all devices on your account. The timestamp in the lower-left corner of the thumbnail shows when the thumbnail was last updated. Learn more about how to manually set your thumbnail.