This article describes how to install an Outdoor 4 Battery Extension Pack.
Warning
This product is only compatible with the Blink Outdoor 4 and Outdoor 2K+ cameras. It cannot be used with any other model of Blink camera.
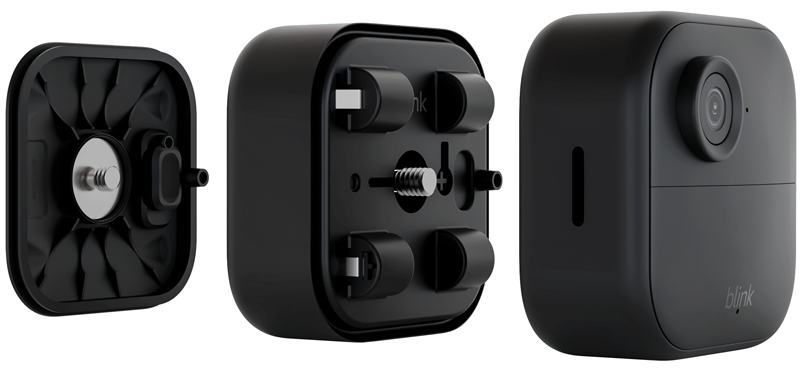
The Battery Extension Pack connects to an Outdoor 4's battery chamber, allowing you to install four AA lithium batteries that are held in place by your camera's back cover.
Note: When you connect the battery pack, the Outdoor 4's USB-C power socket is blocked and the Device Serial Number and QR code sticker is covered.
What's in the box
- Battery Extension Pack
- Four, AA 1.5V lithium batteries
- Quick Start Guide
Installing Battery Extension Pack
- In the Blink app, tap + on the home screen and select Battery Extension Pack.
- Scan the QR Code on the back of your Battery Extension Pack.

- Insert the four included batteries in the proper direction as indicated by positive (+) and negative (-) markings in the battery pack's compartment, starting with the center and working your way outward. Once the batteries have been added, tap Continue in the app.
Note: Do not mix used and new batteries or batteries of different types. Always remove and recycle or dispose of old, weak, or worn-out batteries promptly.

- You will be asked if your Outdoor 4 has already been added to your account.
- If the camera is added, tap Outdoor 4 is Already in My Account.
- If the camera isn't added, tap Add Outdoor 4 to My Account and follow the remaining instructions.
- For assistance with adding an Outdoor 4 camera to your account, please review the Outdoor 4 setup guide.
- For assistance with adding an Outdoor 4 camera to your account, please review the Outdoor 4 setup guide.
- Select which Outdoor 4 you want to add a Battery Extension Pack to. Tap Continue in the app.
- If your Outdoor 4 is not appearing in this list, check the following:
- You're using the correct system to add a Battery Extension Pack to.
- The Outdoor 4 you're wanting to connect to is not connected to an external power source.
- The Outdoor 4 you're wanting to connect to is not connected to other accessories.
- If your Outdoor 4 is not appearing in this list, check the following:
Remove the back cover from your Outdoor 4 camera and remove any existing batteries. To loosen the cover's screw, we recommend using the right-angle adapter that came with your Outdoor 4, but you may also use a coin or a flat-head screwdriver.

-
Once the Outdoor 4's batteries are removed, you are ready to connect the pack to your Outdoor 4. Use the post on the back of the pack as a guide to connect it together with the keyhole on the Outdoor 4 camera. The Battery Extension Pack shares the same dimensions as Outdoor 4, ensuring a seamless alignment of the edges.

- Secure the pack by turning the Battery Extension Pack's screw clockwise until it stops. Take care not to over-tighten. Do not use power tools to secure the screw. If you do not have the right-angle adapter, you may use your fingers, a coin, or a flat-head screwdriver to tighten this screw. Tap Continue in the app.
- Replace the back cover that came with your Outdoor 4. Ensure you are placing it with the Blink logo right-side up. Using the right-angle adapter, a coin, or a flat-head screwdriver, screw the back cover into place. Once again, take care not to over-tighten. Tap Continue in the app.

The app will confirm your Battery Extension Pack has been added successfully.
Mounting Battery Extension Pack
Follow these tips when mounting your device.
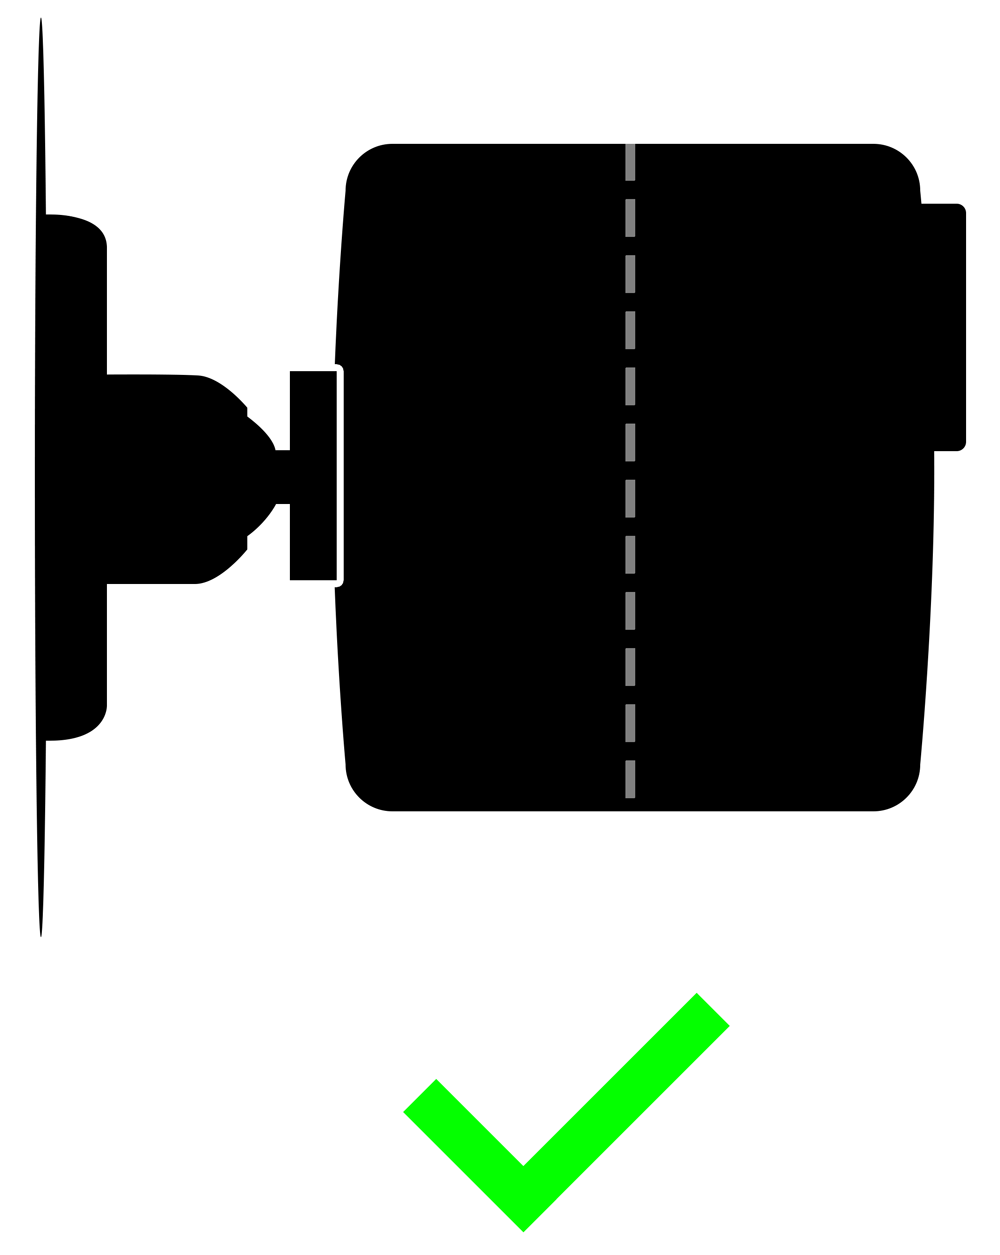
Since you are reusing the same cover that came with your Outdoor 4 to attach to the back of your Battery Extension Pack, it will also use the same mounting hole. Snap the mount into the hole as you would if you were mounting the Outdoor 4.
Mounting on a ceiling
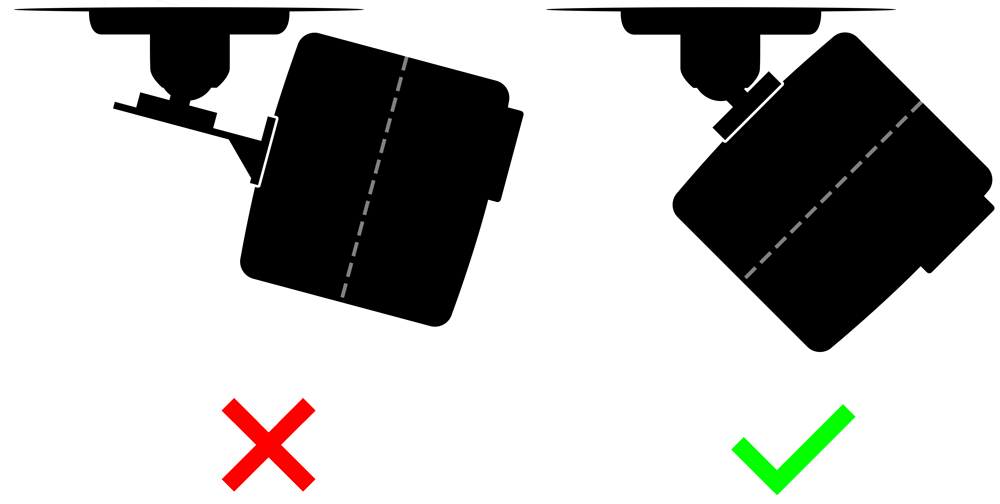
Do not use the right-angle adapter when securing a camera with an attached Battery Extension Pack to the mount.
Mounting on a wall
Learn more about mounting Blink cameras.
Removing Battery Extension Pack
- To remove your Battery Extension Pack, first remove the camera from any mount that it's connected to.
- Remove the back cover by unscrewing the middle screw counter-clockwise. We recommend using the right-angle adapter that came with your Outdoor 4, but you may also use a coin or a flat-head screwdriver. Do not use power tools.

- Remove all batteries from the extension pack. You can use the right-angle adapter to pry the batteries out, if needed.
Do not use a sharp or metal object to pry out the batteries.
- With the right-angle adapter, turn the middle screw counter-clockwise until it is completely loose and spins freely.

If you do not have the right-angle adapter, you may use your fingers, a coin, or a flat-head screwdriver to loosen this screw.
- Insert a pair of new lithium AA batteries into the camera.
- Only replace existing batteries with AA 1.5V lithium batteries.
- Only replace existing batteries with AA 1.5V lithium batteries.
- Return the back cover to the camera and use the right-angle adapter to secure the screw fastener until the back cover is flush with the camera case. Take care not to over-tighten and do not use power tools.
How to add or re-add Outdoor 4 to your account after a Battery Extension Pack is attached
When you connect the extension pack to the camera, the USB-C power socket is blocked and the Device Serial Number (DSN) and the camera's QR code sticker is covered. Your DSN or QR Code needs to be accessible in order to add or re-add Outdoor 4 to your account with a Battery Extension Pack attached.
We suggest the following:
- Save your camera's box. The DSN is located on the outside of it.
- Make a note of the camera's DSN before installation so you can enter it manually when necessary.
- If you've thrown away your box or not saved your DSN, you'll need to remove the Battery Extension Pack to access the DSN or QR code sticker.