Use this guide for setting up your new Blink Mini Camera. Note: Mini 2 customers can visit the Blink Mini 2 Setup Guide.
Getting started
New to Blink? If so, welcome! To set up your new camera, you must first download the Blink app and set up a Blink Account.
Install the Blink app and create an account
If you're new to Blink, begin by downloading the Blink app. Once you have installed the app, you can proceed with creating an account.
Creating a Blink account
With Blink, you have one user account with one email address and phone number. Upon login and certain other actions, a verification number is sent to the mobile number or email address associated with the account. Learn more about setting up a second phone or device.
To get started with the Blink app:
- Open the Blink app and tap Create Account at the bottom of the screen.
- Select your country. Your country is pre-selected based on your IP address. To change it, tap Country, select from the list, then tap Save and Continue.
- Select your county (If applicable). Tap County, select from the list, then tap Save and Continue.
- Enter a valid email address, and tap Next.
- Create a password and tap Create Account. The password requirements are listed at the bottom of the screen. Tap the eye icon to display what you are typing.
- Enter the 6-digit verification code sent to your email, then tap Verify.
- Add a phone number to enable multi-factor authentication (MFA). Choose to receive verification codes via text or voice call. Tap Next.
- Enter the 6-digit verification code you received via text message (SMS) or voice call, then tap Verify (if you don't receive a code, wait 90 seconds and tap Resend Code; if verification fails, tap Try Again).
- Tap Continue to set up your location.
- Either manually enter your address, or select Use my current location.
Note: You may be prompted to grant app permissions to access your location and verify the address on your account. - After entering and verifying your address, tap Save Location.
- Tap Agree and Continue to link your Amazon and Blink accounts, or tap Skip in the top right to bypass this step.
After successfully completing all required steps, you'll be logged in to your Blink account. If you experience issues or require assistance in creating an account, contact Blink Support.
Signing into the Blink app
To sign in to the Blink app:
- Open the Blink app.
- Tap Sign In.
- Enter your email address and tap Continue. If you forgot your password, tap Forgot your password?
- Enter your password and tap Sign In. If a security check identifies your password as compromised, you will be prompted to change it.
- Enter the 6-digit verification code you received via text message (SMS), WhatsApp message, or voice call, then tap Verify (if you don't receive a code, wait 90 seconds and tap Resend Code; if verification fails, tap Try Again).
- To bypass verification when you log in using this device, select Trust this device (up to 30 days).
- If prompted, set up Two-Step Verification, then tap Next. To learn more, visit Securing your Blink Account with Multi-Factor Authentication.
After successful verification, you'll be logged in to your Blink account. If you encounter issues during the sign-in process, please refer to Troubleshooting Blink Account Login Issues.
Setting up your camera
Add your Mini camera to a new or existing system
Your Mini first needs to be powered to be added to a system. Plug your supplied cable into the USB port in the back of the camera and the other end into your power supply. Then plug the power supply into your wall outlet. Once your Mini is receiving power, proceed with the following steps.
1. On the Blink app Home screen, tap the + icon in the top right corner.
2. On Add Device, tap Mini Cameras. You will be asked to scan a QR Code which is located on the back of your Mini camera, above the plug socket. Your camera may request permission to scan the QR code. Otherwise, you can enter the number manually.
Note: If your camera can't correctly focus to scan the QR code, add more light to the scene either with the camera flash or room lighting.
3. Add your camera to an existing system or create a new system name if you'd like. When adding Mini to an existing system, tap the system name to continue.
Note: If you want to use your Mini camera as a doorbell chime, make sure it's added to the same system as your Blink Video Doorbell.
4. You will be instructed to plug in your camera and wait for the lights on the camera's face to appear. One will blink blue and another to be solid green. When this occurs, tap Discover device, and the following message appears: "Blink" Wants to Join Wi-Fi Network"BLINK-XXXX"? Tap Join. Learn more about the Blink Wi-Fi network.
Note: If you don't see a blinking blue light, you may need to reset the camera.
5. On the next screen, select your Wi-Fi network name.
If you're adding the camera to an existing system, be sure you choose the same Wi-Fi network that your other devices are connected to.
6. Once camera successfully connects to your network and reaches out to the Blink servers, your Mini is added. Tap Done to complete the setup and return to the app home screen.
Unable to Connect to Sync Module when adding cameras to a system? Learn more about what to do when you can't connect to the Sync Module when setting up devices.
Helpful tips
The following articles can guide you to enhance your Blink experience.
Mounting the camera
Use this article for understanding how to mount your Blink Mini camera.
How the mount attaches to the Mini
The Mini camera ships with an attached camera mount along with two screws in the box. Be sure to remove the clear protective film covering the lens prior to using the camera.
Depending on the orientation of where the camera will live, you will use one of the two mounting points:
- The vertical mounting point (for walls or other vertical surfaces) is located above the USB port at the rear of the camera.
- The horizontal mounting point (for flat surfaces and ceilings) is located at the bottom of the unit.
The Mini can also fit onto other standard Blink camera mounts.

Mounting the Blink Mini Camera
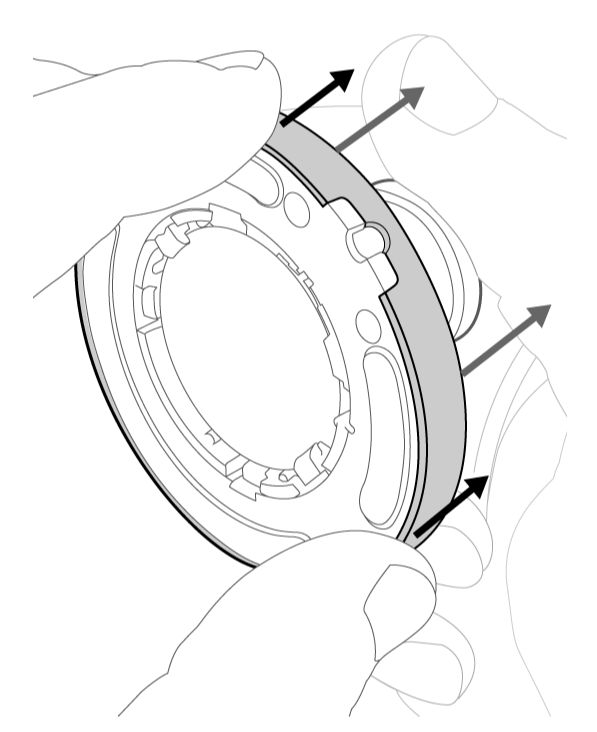
- Hold the camera and pull the mount from the camera. Put the camera in a safe place where the lens will not be scratched.
- While holding the mount in both hands, apply pressure to the outer ring while supporting the mount with the opposite hand.
- Select a location to mount your camera. When you've decided where it will go, use the included screws to secure the mount to your surface. Proper camera placement is important for good image quality. Mini cameras have been used to detect motion through glass. Remember, this is not the most accurate way to detect motion. When using your Mini through glass, be sure to turn off the Recording LED and the Night Vision IR LED to prevent glare from reflected light. Learn about camera placement.

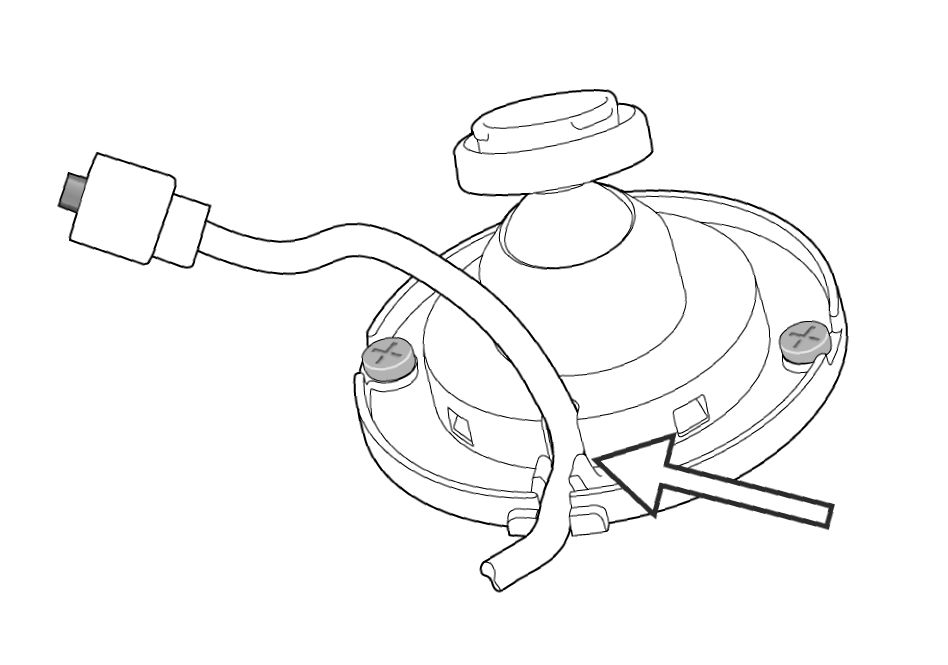
- After the mount is secured, press the cable into the molded clips in the base.
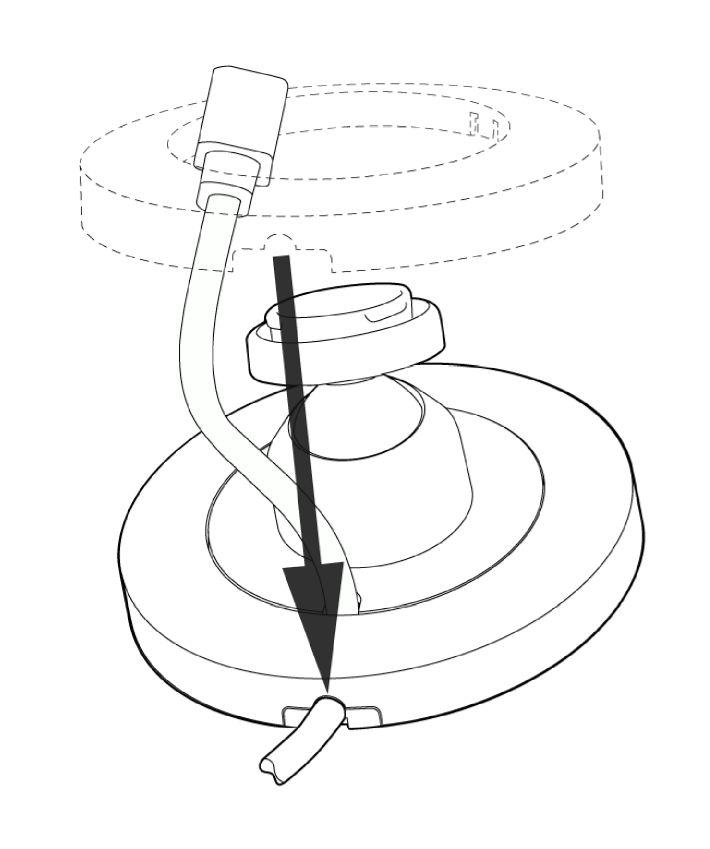
- Thread the cable end through the retaining ring, and line up the notch with the cable. Press all sides of the retaining ring to secure it in place.
- Press the Mini onto the mounting point. It will click into place as the camera is secured.

- Plug the cable into the USB port in the back of the Mini and aim the camera.
- Plug other end of the cable into the power supply and then plug the power supply into your wall outlet.
You can test the camera's orientation by using Live View in the Blink app.
Note: The new Pan-Tilt Mount is designed exclusively for use with the Blink Mini camera and supports user-controlled pan-tilt functionality directly from the Blink app.
Optional: Flipping video
If you want to mount the Mini onto a ceiling or an overhead surface, you may need to flip the camera's video so it outputs properly. You can make this change in the Blink app under Device Settings, by tapping the More button (...) on your camera's thumbnail and select Device Settings  in the lower right corner in the thumbnail image. Then select Video and Photo and tap Flip Video to turn on this setting.
Visit the camera settings page for more information about settings.
Name your camera and set the thumbnail
When you first set up your Blink camera, the default name includes the model and last four digits of its serial number (for example, "Mini 2 - XXXX"), and the thumbnail (camera view) appears as a default image. You can personalize the camera name and thumbnail to better identify your camera's location and view. Customize the following settings at any time.
Changing your camera's name
- Tap the More button (...) at the bottom-right of the device's thumbnail image.
- Tap Device Settings.
- Tap General Settings.
- Tap the camera's current name, enter a new name (such as, Back Porch), and tap Save. Your new camera name now displays.
Important: When you update the name of your camera, clips recorded prior to the name change will appear in your Clip List as that previous name.
Refresh thumbnail
From the Home Screen, tap the More button (...) and select Refresh Thumbnail. The camera takes a screenshot of the current live view and replaces the blue image with this screenshot. The thumbnail remains the same until you refresh it using Refresh Thumbnail. The timestamp in the bottom-left corner of the thumbnail shows when the thumbnail was last updated. Learn more about using the Blink app.
Note: This process doesn't apply to the Video Doorbell (1st Gen) when it's in Event Response Mode, since the thumbnail is updated automatically each time the doorbell ringer button is pressed or a motion event occurs. Learn more about Event Response Mode.
Auto-Update Thumbnail
The Auto-Update Thumbnail feature allows you to refresh your thumbnail image on the Home Screen in the Blink app, with each camera motion event, doorbell press, or Live View session. Updating the thumbnail automatically provides you with information about the latest activity on your camera. Even if you move your camera, the Blink app will automatically capture a new thumbnail image, so you can easily identify each camera's location. See what's happening at a glance, right on your Home Screen.
The Auto-Update Thumbnail is available when you have the following:
- An active Blink Subscription plan or no-cost trial.
- Mini 2, Mini, Outdoor 4, Wired Floodlight, Video Doorbell, Indoor and Outdoor (3rd Gen) cameras.
Learn more about Blink Subscription Plans and features.
Setting Auto-Update Thumbnail
When you add a new eligible camera (as listed above) to your system, Auto-Update Thumbnail is enabled by default. However, this feature is initially turned off for any eligible cameras that were already on your system. Auto-Update Thumbnail can be turned on or off using the following steps.
- Tap the More button (...) in the bottom-right corner in the thumbnail image for your camera on the Home Screen.
- Tap Device Settings.
- Next, select Video and Photo Settings. The Auto-Update Thumbnail setting appears at the bottom of the screen, which can be toggled on or off for that device.
When you have Auto-Update Thumbnail enabled, you also have the option of manually setting your thumbnail for all devices on your account. The timestamp in the bottom-left corner of the thumbnail shows when the thumbnail was last updated. Learn more about how to manually set your thumbnail.
Camera Placement
Proper placement of your Blink cameras and doorbells helps optimize performance, motion detection, and video recordings. Different locations present unique challenges, from lighting conditions to motion detection requirements. When installing your camera consider environmental factors that might affect performance.
Optimizing motion detection
To enhance the effectiveness of motion detection, consider these key factors when positioning your Blink camera or doorbell:
- Position your device to capture side-to-side movement across the field of view.
- Maintain 5-20 feet (1.5-6m) for optimal detection range.
- Mount your device at elevated height to reduce false notifications.
- Avoid placing near bright lights, moving branches, and high-traffic areas with passing vehicles.
If you are using a Sync Module, position it at least 10 feet away from your router to minimize interference.
Different Blink cameras use different detection methods:
- Most Blink cameras and doorbells detect motion through heat signatures.
- Mini cameras use visual detection and can sense movement through glass, though less accurately.
When mounting a Mini camera behind glass:
- Turn off the Recording LED.
- Turn off the Night Vision IR LED.
Reducing unwanted notifications
When placing a Blink camera or doorbell outdoors, motion notifications can be triggered by random objects, moving cars, or shadows. You can reduce unwanted notifications by:
- Adjusting Sensitivity settings.
- Using Motion Zones to block specific areas.
- Implementing Privacy Zones to protect others' privacy.
Improving image quality
Camera placement can affect motion detection and image clarity. Avoid installing cameras behind windows or glass, near flat reflective surfaces, or in high-contrast areas.
For best results:
- Mount cameras with direct views of target areas.
- Use a Blink Mount or Stand.
- Turn off the camera's infrared (IR) light in well-lit environments.
Enhancing sound quality
By following these guidelines, you can significantly improve the audio quality of your recordings and live views:
- Avoid dense materials: Avoid placing cameras near brick, stone, concrete, or metal surfaces, as these materials can reflect sound and create unwanted echoes or distortion.
- Avoid close proximity to electronic devices: Maintain distance from electronic devices like routers, smartphones, and household appliances to prevent electromagnetic interference and unwanted background noise.
- Avoid confined spaces: Choose open spaces with sound-absorbing surfaces for better audio quality. Avoid small closets, narrow hallways, and tight corners, as open areas allow for better sound dispersion and clearer audio capture.
Use the Mini as a Video Doorbell Chime
If you use a Blink Mini, Mini 2, or Mini 2K+ camera with a Video Doorbell, your Mini can work as a chime. This is useful if you don't have a doorbell chime installed in your home.
How it works
When the doorbell's button is pressed, a chime will play from its speaker. The same chime sound plays from each Mini camera that you have connected.
Note: When your Mini is playing the chime sound, it will stop playing for any Mini-based event like recording a motion clip, or entering Live View.
Add your Mini and Doorbell to the same system
As long as the cameras are added to the same system, your Mini can act as a chime for one or more Blink Video Doorbells, or any combination of Blink Video Doorbells and Mini cameras.
| Blink device | How to add a Mini as a Chime |
| Sync Module 2 with a Video Doorbell | Add a Mini to the Sync Module system |
| Sync Module 2 with a Mini Camera | Add a Video Doorbell to the Sync Module system |
| Video Doorbell only | Add a Mini Camera to the Video Doorbell's system |
| Mini Camera only | Add a Video Doorbell to the Mini Camera's system |
Setting up a Mini as a Video Doorbell chime
- If you already have one or more Mini cameras on the same system as your doorbell, tap the More... button located at the bottom-right corner of the doorbell's thumbnail to access Device Settings and select Doorbell and Chime Settings.
- Tap Use Blink Mini Camera as Chime.
- All Mini cameras that are on the same system as your doorbell will be displayed. If you don't see your Mini, see the troubleshooting tip below.
- Select one or more Mini cameras by tapping the circle to the right of the camera name. Once selected, a blue checkmark displays.
- Tap Save and your Mini camera(s) will chime when your Video Doorbell's button is pressed.
Event Response Mode (Video Doorbell 1st Gen - Only)
If your Video Doorbell (1st Gen) is in Event Response mode, you must press the doorbell's button to save changes to your doorbell's Settings.
Mini settings for the chime
Once your Mini and Video Doorbell are on the same system, you can control the chime volume by selecting the More... button located at the bottom-right corner of the doorbell's thumbnail to access Device Settings. Then tap Audio Settings to adjust volume levels.
Speaker Volume: Adjust this slider to change the speaker volume of your camera.
Mini as a Chime Volume: Adjust this slider to change how loud your Mini camera's speaker will play the chime.
Troubleshooting
How do I add my Mini to my Video Doorbell system?
When you add a new Mini in the Blink app, you will be prompted to select your existing system or Create a new system. Tap your existing system and select the system that contains your Video Doorbell.
If you have already added your Mini in the Blink app:
- Delete the Mini from its current system. Learn more about how to delete a camera.
- Add the Mini again and tap your existing system and select the system containing your Video Doorbell.
What if I don't see my Mini?
Each Mini camera used as a chime must be on the same system as the doorbell. If you open the Doorbell and Chime Settings and do not see a Mini camera that you have added, the Mini may be in a different system. If you have multiple systems, they will be separated by gray tabs at the top of the home screen. If your Mini camera displays on the Blink app home screen, the system name is located in gray tab above it.
If you have already added your Mini in the Blink app:
- Delete the Mini from its current system. Learn more about how to delete a camera.
- Add the Mini again and tap your existing system and select the system containing your Video Doorbell.